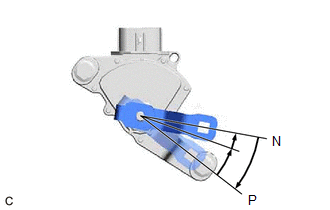
INSTALLATION PROCEDURE 1. INSTALL SHIFT LEVER POSITION SENSOR (a) Move the shift lever to N.
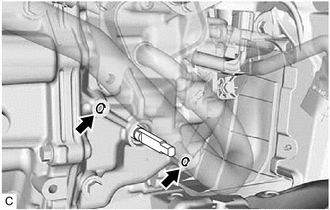
(c) Temporarily install the shift lever position sensor to the hybrid vehicle transaxle assembly with 2 new bolts. NOTICE:
(d) Install the lock plate to the shift lever position sensor with the lock nut. Torque: 6.9 N·m {70 kgf·cm, 61 in·lbf} (e) Temporarily install the control shaft lever to the shift lever position sensor.
(g) Remove the control shaft lever from the shift lever position sensor.
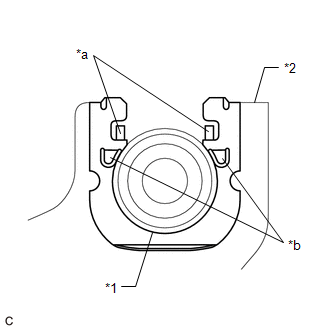
(i) Tighten the 2 bolts. Torque: 11 N·m {112 kgf·cm, 8 ft·lbf} (j) Using a screwdriver with its tip wrapped with protective tape, secure the lock nut with the lock plate. (k) Install the control shaft lever and washer to the shift lever position sensor with the nut. Torque: 12.7 N·m {130 kgf·cm, 9 ft·lbf} (l) Connect the shift lever position sensor connector. 2. CONNECT TRANSMISSION CONTROL CABLE ASSEMBLY (a) Engage the 2 claws to install a new clip to the transmission control cable assembly.
(c) Connect the transmission control cable assembly to the control shaft lever with the nut. Torque: 12 N·m {122 kgf·cm, 9 ft·lbf} 3. INSTALL AIR CLEANER ASSEMBLY WITH AIR CLEANER HOSE Click here 4. INSTALL NO. 1 ENGINE COVER SUB-ASSEMBLY Click here 5. INSTALL INLET AIR CLEANER ASSEMBLY Click here 6. INSTALL COOL AIR INTAKE DUCT SEAL Click here 7. INSPECT SHIFT LEVER POSITION SENSOR POSITION Click here 8. ADJUST SHIFT LEVER POSITION SENSOR POSITION Click here 9. INSPECT SHIFT LEVER POSITION Click here 10. ADJUST SHIFT LEVER POSITION Click here 11. INSTALL NO. 2 ENGINE UNDER COVER ASSEMBLY Click here 12. INSTALL NO. 1 ENGINE UNDER COVER Click here 13. INSTALL FRONT WHEEL OPENING EXTENSION PAD LH Click here 14. INSTALL FRONT WHEEL OPENING EXTENSION PAD RH Click here |
Toyota Avalon (XX50) 2019-2022 Service & Repair Manual > Airbag System(for Gasoline Model): Short in Curtain Shield Airbag (RH) Squib Circuit (B1830-B1833)
DESCRIPTION The curtain shield squib RH circuit consists of the airbag ECU assembly and curtain shield airbag assembly RH. The airbag ECU assembly uses this circuit to deploy the airbag when deployment conditions are met. These DTCs are stored when a malfunction is detected in the curtain shield squ ...