Toyota Avalon (XX50) 2019-2022 Service & Repair Manual: Installation

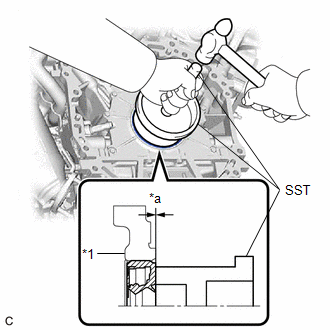
INSTALLATION

PROCEDURE

1. INSTALL REAR ENGINE OIL SEAL

(a) Using height adjustment attachments and plate lift attachments, place the engine assembly on a flat level surface.

NOTICE:

  • Using height adjustment attachments and plate lift attachments, keep the engine assembly level.
  • To prevent the No. 2 oil pan sub-assembly from deforming, do not place any attachments under the No. 2 oil pan sub-assembly of the engine assembly.
  • Using an engine sling device and engine lift, secure the engine assembly before servicing.

(b) Apply MP grease to the lip of a new rear engine oil seal.

NOTICE:

  • Keep the lip free from foreign matter.
  • Do not tap in the rear engine oil seal at an angle.

*1

Rear Engine Oil Seal Retainer

*a

Oil Seal Protrusion Height

(c) Using SST and a hammer, tap in the rear engine oil seal.

SST: 09223-15030

SST: 09950-70010

09951-07150

Oil Seal Protrusion Height:

-0.5 to 0.5 mm (-0.0197 to 0.0197 in.)

NOTICE:

Do not tap in the rear engine oil seal at an angle.

2. INSTALL NO. 1 CRANKSHAFT POSITION SENSOR PLATE

(a) Install the No. 1 crankshaft position sensor plate.

HINT:

Align the pin of the No. 1 crankshaft position sensor plate with the pin hole of the crankshaft.

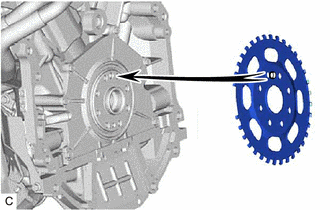
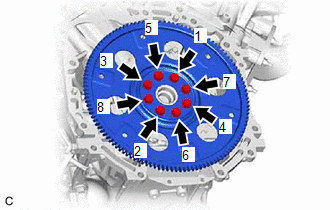
3. INSTALL DRIVE PLATE AND RING GEAR SUB-ASSEMBLY

(a) Using SST, hold the crankshaft pulley.

SST: 09213-70011

09213-70020

SST: 09330-00021

(b) Clean the 8 bolts and 8 bolt holes.

(c) Install the drive plate and ring gear sub-assembly and rear drive plate spacer to the crankshaft.

*1

Drive Plate and Ring Gear Sub-assembly

*2

Rear Drive Plate Spacer

Transaxle Side

(d) Apply adhesive to 2 or 3 threads at the end of each of the 8 bolts.

Adhesive:

Toyota Genuine Adhesive 1324, Three Bond 1324 or equivalent

*a

Adhesive

(e) Install and uniformly tighten the 8 bolts in several steps in the sequence shown in the illustration.

Torque:

83 N·m {846 kgf·cm, 61 ft·lbf}

NOTICE:

Do not start the engine for at least 1 hour after installing the drive plate and ring gear sub-assembly.

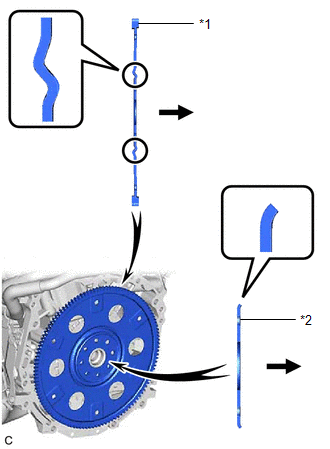
4. INSTALL AUTOMATIC TRANSAXLE ASSEMBLY

Click here

    Components

    Removal

    See More:

    Toyota Avalon (XX50) 2019-2022 Service & Repair Manual > Can Communication System(for Hv Model): Skid Control ECU Communication Stop Mode
    DESCRIPTION Detection Item Symptom Trouble Area Skid Control ECU Communication Stop Mode Any of the following conditions are met: Communication stop for "Skid Control (ABS/VSC/TRAC)" is indicated on the "Communication Bus Check" screen of the Techstream. Click here Communication stop history for "Sk ...

    Toyota Avalon (XX50) 2019-2022 Owners Manual

    Toyota Avalon (XX50) 2019-2022 Service & Repair Manual

    © 2024 Copyright www.tavalon.net
    0.0147