INSTALLATION CAUTION / NOTICE / HINT NOTICE:
HINT:
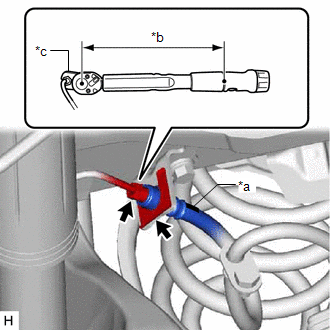
PROCEDURE 1. INSTALL REAR FLEXIBLE HOSE NOTICE: When installing the rear flexible hose, minimize twisting of the hose.
(b) Using a union nut wrench, connect the brake line to the rear flexible hose while holding the rear flexible hose with a wrench. Torque: Specified tightening torque : 15.2 N·m {155 kgf·cm, 11 ft·lbf} NOTICE:
HINT:
(c) Install the rear flexible hose to the rear flexible hose bracket with the bolt. Torque: 29 N·m {296 kgf·cm, 21 ft·lbf} (d) Install the rear flexible hose to the rear disc brake cylinder assembly with a new union bolt and a new gasket. Torque: 29 N·m {296 kgf·cm, 21 ft·lbf} NOTICE: Install the rear flexible hose lock securely into the lock hole in the rear disc brake cylinder assembly. 2. CONNECT CABLE TO NEGATIVE AUXILIARY BATTERY TERMINAL (for HV Model) (a) Connect the reservoir level switch connector. (b) Connect the cable to the negative (-) auxiliary battery terminal. Click here 3. BLEED BRAKE LINE for Gasoline Model: Click here for HV Model: Click here
4. INSTALL REAR WHEEL Click here
|
Toyota Avalon (XX50) 2019-2022 Service & Repair Manual > Park / Neutral Position Switch: Installation
INSTALLATION PROCEDURE 1. INSTALL PARK/NEUTRAL POSITION SWITCH ASSEMBLY (a) Temporarily install the park/neutral position switch assembly to the automatic transaxle case sub-assembly with the 2 bolts. NOTICE: Before installing the park/neutral position switch assembly, remove any dirt or rust on the ...