ON-VEHICLE INSPECTION PROCEDURE 1. CHECK FUEL PUMP OPERATION AND INSPECT FOR FUEL LEAK (a) Check fuel pump operation. (1) Connect the Techstream to the DLC3. (2) Turn the engine switch on (IG). NOTICE: Do not start the engine. (3) Turn the Techstream on. (4) Enter the following menus: Powertrain / Engine / Active Test / Activate the Circuit Relay. Powertrain > Engine > Active Test
(5) Check for pressure in the fuel tube sub-assembly from the fuel line. Check that sounds of fuel flowing from the fuel tank assembly can be heard. If no sounds can be heard, check the relay, fuel pump, ECM and wiring connectors. (b) Inspect for fuel leaks. (1) Check that there are no fuel leaks from the fuel system after doing any maintenance or repairs. If there is a fuel leak, repair or replace parts as necessary. (c) Turn the engine switch off. (d) Disconnect the Techstream from the DLC3. 2. CHECK FUEL PRESSURE (a) Discharge fuel system pressure. Click here
(b) Measure the battery voltage. Standard Voltage: 11 to 14 V (c) Disconnect the cable from the negative (-) battery terminal. NOTICE: When disconnecting the cable, some systems need to be initialized after the cable is reconnected. Click here
(i) Wipe up any spilled fuel. (j) Connect the cable to the negative (-) battery terminal. NOTICE: When disconnecting the cable, some systems need to be initialized after the cable is reconnected. Click here (k) Connect the Techstream to the DLC3. (l) Turn the engine switch on (IG). NOTICE: Do not start the engine. (m) Turn the Techstream on. (n) Enter the following menus: Powertrain / Engine / Active Test / Activate the Circuit Relay. Powertrain > Engine > Active Test
(o) Measure the fuel pressure. Standard Fuel Pressure: 196 to 833 kPa (2.0 to 8.5 kgf/cm2, 28 to 121 psi)
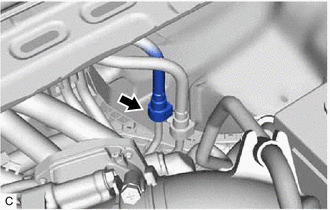
(p) Disconnect the Techstream from the DLC3. (q) Start the engine. (r) Measure the fuel pressure at idle. Standard Fuel Pressure: 196 to 833 kPa (2.0 to 8.5 kgf/cm2, 28 to 121 psi) HINT: Refer to Standard Idle Speed. Click here (s) Stop the engine. (t) Check that the fuel pressure remains as specified for 5 minutes. Standard Fuel Pressure: 98 kPa (1.0 kgf/cm2, 14.2 psi) or more If the result is not as specified, check the fuel pump, fuel main valve assembly and/or fuel injector assemblies. (u) After checking the fuel pressure, disconnect the cable from the negative (-) battery terminal and carefully remove SST to prevent fuel from spraying. NOTICE: When disconnecting the cable, some systems need to be initialized after the cable is reconnected. Click here (v) Connect the fuel tube sub-assembly (for Port Injection). (1) Connect the fuel tube sub-assembly to the fuel pipe. Click here
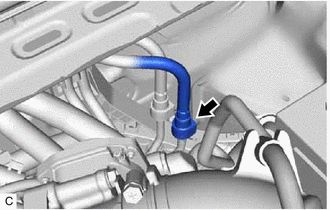
(w) Connect the No. 2 fuel tube sub-assembly (for Direct Injection). (1) Connect the No. 2 fuel tube sub-assembly to the fuel pipe. Click here
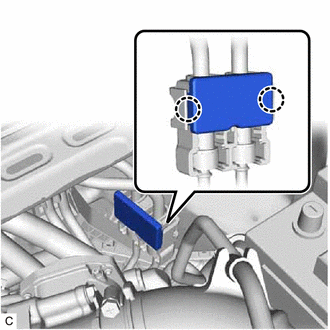
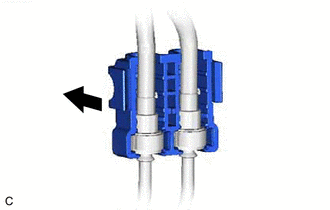
(x) Install the No. 1 fuel pipe clamp to the fuel tube connector. (y) Engage the 2 claws to install the No. 2 fuel pipe clamp. (z) Inspect for fuel leaks. Click here 3. CHECK FUEL PRESSURE (for High Pressure) (a) Connect the Techstream to the DLC3. (b) Turn the engine switch on (IG). (c) Turn the Techstream on. (d) Enter the following menus: Powertrain / Engine / Data List / Engine Speed, Coolant Temperature, Fuel Pressure (High) and Injection Mode. Powertrain > Engine > Data List
(e) Start the engine and warm it up until the engine coolant temperature is 75°C (167°F) or higher with all the accessories switched off. (f) According to the display on the Techstream, read the Data List. Standard:
If the result is not as specified, check the fuel pump, fuel pump assembly, fuel pressure sensor (fuel delivery pipe with sensor assembly LH) (for High Pressure) and wire harnesses. (g) Stop the engine. |
Toyota Avalon (XX50) 2019-2022 Service & Repair Manual > Electronically Controlled Brake System(for Hv Model): Brake Hold Standby Indicator Light Circuit
DESCRIPTION The brake hold standby indicator light turns on if brake hold control is possible when the following conditions required for operation standby are met and the brake hold switch (electric parking brake switch assembly) is turned on while the power switch is on (IG). Conditions required fo ...