INSTALLATION CAUTION / NOTICE / HINT NOTICE: This procedure includes the installation of small-head bolts. Refer to Small-Head Bolts of Basic Repair Hint to identify the small-head bolts. Click here
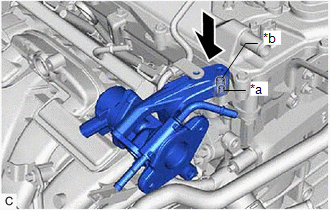
PROCEDURE 1. INSTALL EGR VALVE ASSEMBLY HINT: Perform "Inspection After Repair" after replacing the EGR valve assembly. Click here (a) Using an 8 mm socket wrench, install the EGR valve assembly to the EGR valve bracket with the bolt. Torque: 10 N·m {102 kgf·cm, 7 ft·lbf}
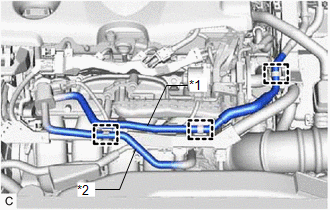
(c) Using the 8 mm socket wrench, install the EGR valve assembly with the EGR valve bracket to the camshaft housing with the bolt. Torque: 10 N·m {102 kgf·cm, 7 ft·lbf} (d) Using the 8 mm socket wrench, connect the fuel pipe sub-assembly to the EGR valve bracket with the bolt. Torque: 10 N·m {102 kgf·cm, 7 ft·lbf} (e) Connect the No. 4 water by-pass hose and No. 8 water by-pass hose to the EGR valve assembly and slide the 2 clips to secure them. 2. INSTALL NO. 1 EGR PIPE SUB-ASSEMBLY (a) Install a new EGR inlet gasket to the intake manifold. (b) Install a new EGR valve adapter gasket to the No. 1 EGR pipe sub-assembly. (c) Using an 8 mm socket wrench, install the No. 1 EGR pipe sub-assembly to the intake manifold and EGR valve assembly with the 4 bolts. Torque: 10 N·m {102 kgf·cm, 7 ft·lbf} 3. CONNECT EGR COOLER ASSEMBLY
(b) Connect the EGR cooler assembly to the EGR valve assembly with the 2 bolts. Torque: 21 N·m {214 kgf·cm, 15 ft·lbf} 4. CONNECT ENGINE WIRE (a) Engage the 2 wire harness clamps to connect the engine wire. (b) Install the bolt. Torque: 10 N·m {102 kgf·cm, 7 ft·lbf} (c) Connect the EGR valve assembly connector.
5. ADD ENGINE COOLANT (for Engine) Click here
6. INSPECT FOR COOLANT LEAK (for Engine) Click here 7. INSPECT FOR EXHAUST GAS LEAK Click here 8. PERFORM INITIALIZATION (a) Perform "Inspection After Repair" after replacing the EGR valve assembly. Click here |
Toyota Avalon (XX50) 2019-2022 Service & Repair Manual > Knee Airbag Assembly(for Driver Side): On-vehicle Inspection
ON-VEHICLE INSPECTION CAUTION / NOTICE / HINT CAUTION: Be sure to correctly follow the removal and installation procedures for the lower No. 1 instrument panel airbag assembly. PROCEDURE 1. INSPECT LOWER NO. 1 INSTRUMENT PANEL AIRBAG ASSEMBLY (for Vehicle not Involved in Collision) (a) Perform a dia ...