DESCRIPTION The headlight ECU sub-assembly operates the low beam fan to cool the headlight LED unit in order to prevent the headlight LED unit from overheating. Illuminates the low beam headlights and continuously operates the low beam fan. The headlight ECU sub-assembly monitors the pulse signals from the FANP terminal when the low beam fans are operating. HINT: If B243D or B243E is output, the headlight ECU sub-assembly performs low beam headlight dimming control.
WIRING DIAGRAM 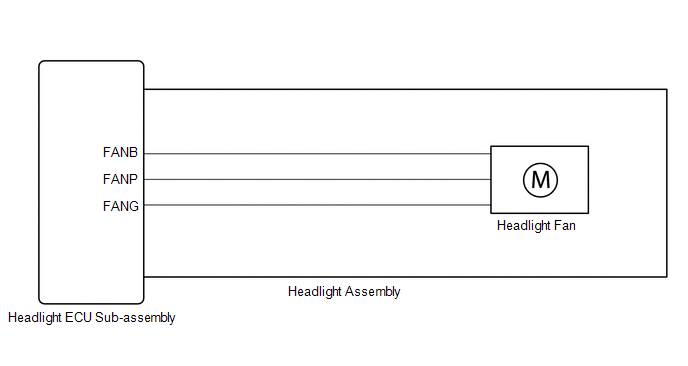 CAUTION / NOTICE / HINT NOTICE:
PROCEDURE
(a) Connect the Techstream to the DLC3. (b) Turn the engine switch on (IG). (c) Turn the Techstream on. (d) Enter the following menus: Body Electrical / HL AutoLeveling or HL AutoLeveling (Sub) / Trouble Codes. (e) Clear the DTCs. Body Electrical > HL AutoLeveling > Clear DTCs Body Electrical > HL AutoLeveling (Sub) > Clear DTCs
(a) Connect the Techstream to the DLC3. (b) Turn the engine switch on (IG). (c) Operate the light control switch to turn on the low beam headlights and wait 4 seconds or more. (d) Turn the Techstream on. (e) Enter the following menus: Body Electrical / HL AutoLeveling or HL AutoLeveling (Sub) / Trouble Codes. (f) Check for DTCs. Body Electrical > HL AutoLeveling > Trouble Codes Body Electrical > HL AutoLeveling (Sub) > Trouble CodesOK: DTC B243D and B243E are not output.
(a) Remove each headlight ECU sub-assembly, interchange the headlight assembly LH with RH and connect the connectors. Click here
(a) Connect the Techstream to the DLC3. (b) Turn the engine switch on (IG). (c) Turn the Techstream on. (d) Enter the following menus: Body Electrical / HL AutoLeveling or HL AutoLeveling (Sub) / Trouble Codes. (e) Clear the DTCs. Body Electrical > HL AutoLeveling > Clear DTCs Body Electrical > HL AutoLeveling (Sub) > Clear DTCs
(a) Connect the Techstream to the DLC3. (b) Turn the engine switch on (IG). (c) Operate the light control switch to turn on the low beam headlights and wait 4 seconds or more. (d) Turn the Techstream on. (e) Enter the following menus: Body Electrical / HL AutoLeveling or HL AutoLeveling (Sub) / Trouble Codes. (f) Check for DTCs. Body Electrical > HL AutoLeveling > Trouble Codes Body Electrical > HL AutoLeveling (Sub) > Trouble Codes
(a) Remove each headlight ECU sub-assembly, interchange the headlight assembly RH with LH and connect the connectors. Click here
(a) Connect the Techstream to the DLC3. (b) Turn the engine switch on (IG). (c) Turn the Techstream on. (d) Enter the following menus: Body Electrical / HL AutoLeveling or HL AutoLeveling (Sub) / Trouble Codes. (e) Clear the DTCs. Body Electrical > HL AutoLeveling > Clear DTCs Body Electrical > HL AutoLeveling (Sub) > Clear DTCs
(a) Connect the Techstream to the DLC3. (b) Turn the engine switch on (IG). (c) Operate the light control switch to turn on the low beam headlights and wait 4 seconds or more. (d) Turn the Techstream on. (e) Enter the following menus: Body Electrical / HL AutoLeveling or HL AutoLeveling (Sub) / Trouble Codes. (f) Check for DTCs. Body Electrical > HL AutoLeveling > Trouble Codes Body Electrical > HL AutoLeveling (Sub) > Trouble Codes
|
Toyota Avalon (XX50) 2019-2022 Service & Repair Manual > Sfi System: Random/Multiple Cylinder Misfire Detected (P030000,P030027,P030085-P030400)
DESCRIPTION When the engine misfires, high concentrations of hydrocarbons (HC) enter the exhaust gas. Extremely high hydrocarbon concentration levels can cause an increase in exhaust emission levels. Extremely high concentrations of hydrocarbons can also cause increases in the three-way catalytic co ...


