DESCRIPTION When the light control switch is in the tail or head position, the main body ECU (multiplex network body ECU) sends an illumination request signal to the headlight ECU sub-assembly LH/RH to illuminate the front side marker lights. WIRING DIAGRAM 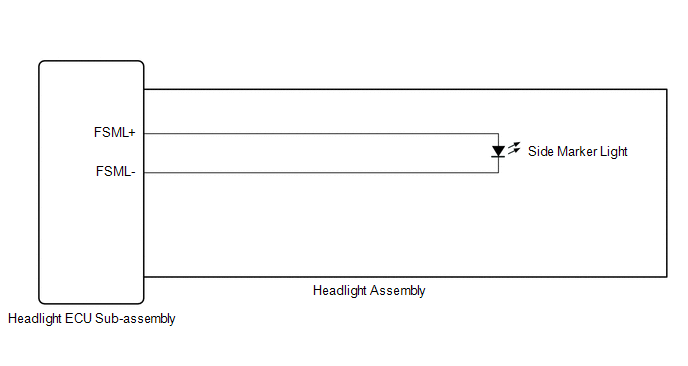 CAUTION / NOTICE / HINT NOTICE:
PROCEDURE
(a) Check the illumination of each front side marker lights.
(a) Connect the Techstream to the DLC3. (b) Turn the power switch on (IG). (c) Turn the Techstream on. (d) Enter the following menus: Body Electrical / HL AutoLeveling / Active Test. (e) Perform the Active Test according to the display on the Techstream. Body Electrical > HL AutoLeveling > Active Test
OK: Front side marker light illuminate.
(a) Remove each headlight ECU sub-assembly, interchange the headlight assembly LH with RH and connect the connectors. Click here
(a) Check that the front side marker light operates normally. OK: Front side marker light operates normally.
(a) Connect the Techstream to the DLC3. (b) Turn the power switch on (IG). (c) Turn the Techstream on. (d) Enter the following menus: Body Electrical / HL AutoLeveling (Sub) / Active Test. (e) Perform the Active Test according to the display on the Techstream. Body Electrical > HL AutoLeveling (Sub) > Active Test
OK: Front side marker light illuminate.
(a) Remove each headlight ECU sub-assembly, interchange the headlight assembly RH with LH and connect the connectors. Click here
(a) Check that the front side marker light operates normally. OK: Front side marker light operates normally.
|
Toyota Avalon (XX50) 2019-2022 Service & Repair Manual > Lighting System(for Gasoline Model): Front Door Courtesy Switch Circuit
DESCRIPTION The main body ECU (multiplex network body ECU) detects the condition of the front door courtesy light switch assembly. WIRING DIAGRAM CAUTION / NOTICE / HINT NOTICE: Before replacing the main body ECU (multiplex network body ECU), refer to Registration. Click here PROCEDURE 1. READ VALUE ...


