REMOVAL PROCEDURE 1. DISCONNECT FRONT DOOR OPENING TRIM WEATHERSTRIP LH Click here 2. REMOVE FRONT PILLAR GARNISH LH Click here 3. DISCONNECT FRONT DOOR OPENING TRIM WEATHERSTRIP RH HINT: Use the same procedure as for the LH side. 4. REMOVE FRONT PILLAR GARNISH RH HINT: Use the same procedure as for the LH side. 5. REMOVE NO. 1 DEFROSTER NOZZLE GARNISH Click here 6. REMOVE FRONT NO. 2 SPEAKER ASSEMBLY NOTICE: Do not touch the speaker cone. HINT:
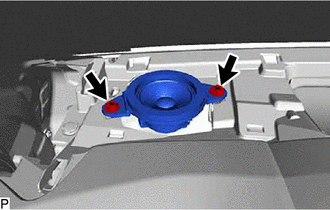
(b) Lift the front No. 2 speaker assembly and disconnect the connector to remove it. 7. REMOVE FRONT NO. 4 SPEAKER ASSEMBLY (for 14 Speakers) NOTICE: Do not touch the speaker cone.
(b) Lift the front No. 4 speaker assembly and disconnect the connector to remove it. |
Toyota Avalon (XX50) 2019-2022 Service & Repair Manual > Rear Door Speaker: Inspection
INSPECTION PROCEDURE 1. INSPECT REAR SPEAKER ASSEMBLY (a) With the speaker installed, check that there is no looseness or other abnormalities. (b) Check that there is no foreign matter in the speaker, no tears on the speaker cone or other abnormalities. (c) Measure the resistance of the speaker. Sta ...