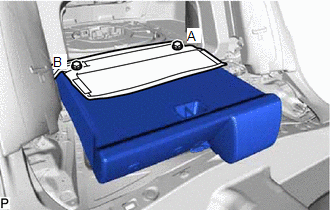
INSTALLATION CAUTION / NOTICE / HINT CAUTION: Wear protective gloves. Sharp areas on the parts may injure your hands. PROCEDURE 1. INSTALL REAR SIDE SEATBACK ASSEMBLY LH (a) Place the rear side seatback assembly LH in the cabin. NOTICE: Be careful not to damage the vehicle body. (b) Engage the hook as shown in the illustration. 
(c) Install the rear side seatback assembly LH with the bolt. Torque: 18 N·m {184 kgf·cm, 13 ft·lbf} (d) Connect the rear side seatback assembly LH connector. (1) Before connecting the connector, check that the position of the housing lock is correct as shown in the illustration. 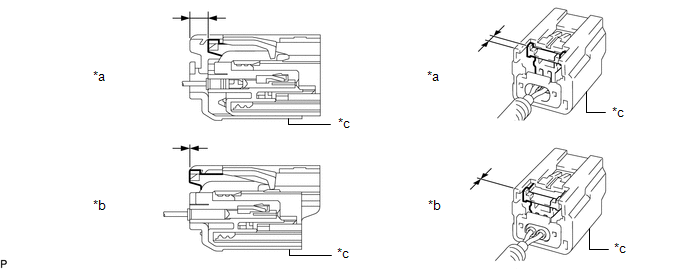
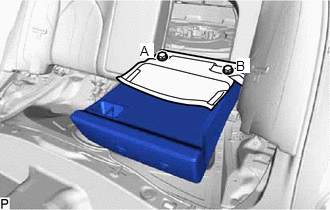
(e) Connect the cable to the negative (-) auxiliary battery terminal. NOTICE: When disconnecting the cable, some systems need to be initialized after the cable is reconnected. Click here 2. INSTALL REAR SIDE SEATBACK ASSEMBLY RH HINT: Use the same procedure as for the LH side. 3. INSTALL REAR SEATBACK ASSEMBLY RH (a) Place the rear seatback assembly RH in the cabin. NOTICE: Be careful not to damage the vehicle body. (b) Engage the 2 guides. (c) Temporarily install the rear seatback assembly RH with the 2 bolts.
(e) w/ Seat Heater System: (1) Engage the clamp. (f) Return the rear seatback assembly RH to its original position. 4. INSTALL REAR SEATBACK ASSEMBLY LH (a) Place the rear seatback assembly LH in the cabin. NOTICE: Be careful not to damage the vehicle body. (b) Engage the 2 guides. (c) Temporarily install the rear seatback assembly LH with the 2 bolts.
(e) w/ Seat Heater System: (1) Engage the clamp. (f) Return the rear seatback assembly LH to its original position. 5. INSTALL REAR SEAT CUSHION LOCK HOOK (a) Engage the 2 claws to install a new rear seat cushion lock hook as shown in the illustration. HINT: Use the same procedure for the RH side and LH side. 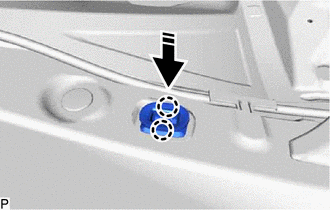
6. INSTALL REAR SEAT CUSHION ASSEMBLY (a) Place the rear seat cushion assembly in the cabin. NOTICE: Be careful not to damage the vehicle body. (b) for Gasoline Model: 
(1) Engage the 2 rear seat cushion frame hooks on the rear side of the rear seat cushion assembly as shown in the illustration. (2) Engage the 2 rear seat cushion frame hooks on the front side of the rear seat cushion assembly as shown in the illustration to install the rear seat cushion assembly. NOTICE: Confirm that the rear seat cushion assembly is securely installed. (c) for HV Model: (1) Engage the 2 rear seat cushion frame hooks on the rear side of the rear seat cushion assembly as shown in the illustration. 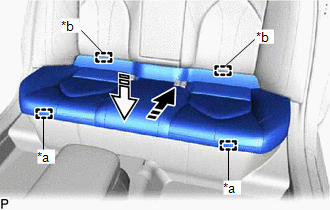
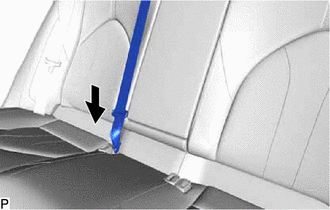
(2) Engage the 2 rear seat cushion frame hooks on the front side of the rear seat cushion assembly as shown in the illustration to install the rear seat cushion assembly. NOTICE: Confirm that the rear seat cushion assembly is securely installed. (d) w/ Seat Heater System (for LH Side): (1) Connect the 2 connectors. (2) Engage the 2 clamps. (e) w/ Seat Heater System (for RH Side): (1) Connect the 2 connectors. (2) Engage the 2 clamps. 7. CONNECT REAR CENTER SEAT OUTER BELT ASSEMBLY
8. INSTALL REAR SEAT HEADREST ASSEMBLY (a) Install the 2 rear seat headrest assemblies. 9. CONNECT CABLE TO NEGATIVE AUXILIARY BATTERY TERMINAL for A25A-FXS: Click here for 2GR-FKS: Click here
10. INSTALL LUGGAGE COMPARTMENT INNER TRIM PAD (w/ Seat Heater System) Click here 11. INSTALL SPARE WHEEL COVER ASSEMBLY (w/ Seat Heater System) Click here 12. INSTALL LUGGAGE TRIM SERVICE HOLE COVER (for HV Model) Click here 13. PERFORM DIAGNOSTIC SYSTEM CHECK for HV Model: Click here for Gasoline Model: Click here 14. INSPECT SRS WARNING LIGHT for HV Model: Click here for Gasoline Model: Click here 15. CHECK SEAT HEATER (w/ Seat Heater System) for HV Model: Click here for Gasoline Model: Click here |
Toyota Avalon (XX50) 2019-2022 Service & Repair Manual > Fuel Pump(for High Pressure): Inspection
INSPECTION PROCEDURE 1. INSPECT FUEL PUMP ASSEMBLY (a) Measure the resistance according to the value(s) in the table below. Standard Resistance: Tester Connection Condition Specified Condition 1 - 2 20°C (68°F) 0.45 to 0.55 Ω If the result is not as specified, replace the fuel pump assembly. *a C ...