COMPONENTS
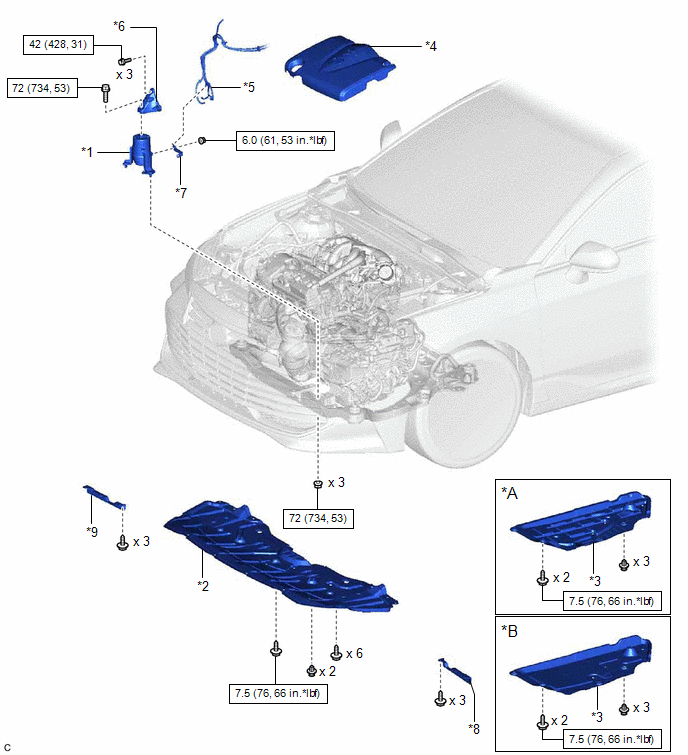
ILLUSTRATION
|
*A | Type A |
*B | Type B |
|
*1 | FRONT ENGINE MOUNTING INSULATOR |
*2 | NO. 1 ENGINE UNDER COVER |
|
*3 | REAR ENGINE UNDER COVER LH |
*4 | V-BANK COVER SUB-ASSEMBLY |
|
*5 | VACUUM HOSE |
*6 | FRONT ENGINE MOUNTING BRACKET |
|
*7 | STAY |
*8 | FRONT WHEEL OPENING EXTENSION PAD LH |
|
*9 | FRONT WHEEL OPENING EXTENSION PAD RH |
- | - |
 |
N*m (kgf*cm, ft.*lbf): Specified torque |
- | - |
INSTALLATION
PROCEDURE
1. INSTALL FRONT ENGINE MOUNTING INSULATOR
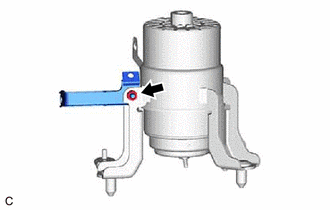
(a) Install the stay to the front engine mounting insulator with the nut.
Torque:
6.0 N·m {61 kgf·cm, 53 in·lbf}
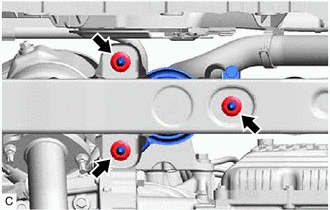
(b) Install the front engine mounting insulator to the front frame assembly with the 3 nuts.
Torque:
72 N·m {734 kgf·cm, 53 ft·lbf}
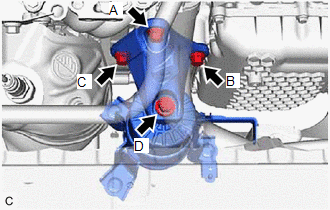
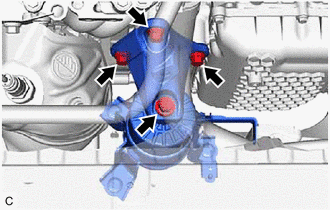
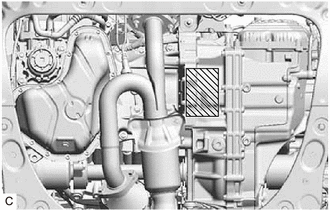
| (c) Install the front engine mounting bracket to the transaxle housing with the 3 bolts. Torque: Bolt (A), (B) and (C) : 42 N·m {428 kgf·cm, 31 ft·lbf} NOTICE: Temporarily tighten the bolt (A), and then fully tighten the 3 bolts in the order of (B), (C) and (A). |
|
(d) Install the front engine mounting bracket to the front engine mounting insulator with the bolt.
Torque:
Bolt (D) :
72 N·m {734 kgf·cm, 53 ft·lbf}
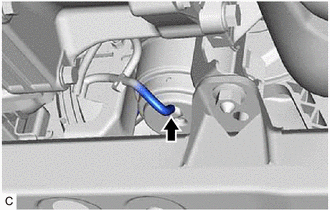
(e) Connect the vacuum hose to the front engine mounting insulator.
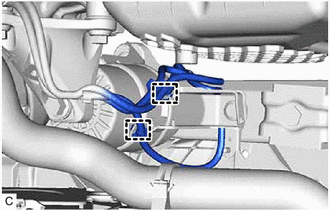
(f) Engage the 2 clamps to install the vacuum hoses to the front engine mounting insulator.
2. INSTALL REAR ENGINE UNDER COVER LH
Click here

3. INSTALL NO. 1 ENGINE UNDER COVER
Click here
4. INSTALL FRONT WHEEL OPENING EXTENSION PAD LH
Click here
5. INSTALL FRONT WHEEL OPENING EXTENSION PAD RH
Click here
6. INSTALL V-BANK COVER SUB-ASSEMBLY
Click here
7. INSTALL VACUUM SWITCHING VALVE (for Active Control Engine Mount System)
Click here
ON-VEHICLE INSPECTION
CAUTION / NOTICE / HINT
HINT:
Refer to Problem Symptoms Table.
Click here

PROCEDURE
1. REMOVE FRONT WHEEL OPENING EXTENSION PAD LH
Click here
2. REMOVE FRONT WHEEL OPENING EXTENSION PAD RH
Click here
3. REMOVE NO. 1 ENGINE UNDER COVER
Click here
4. REMOVE REAR ENGINE UNDER COVER LH
Click here
5. INSPECT FRONT ENGINE MOUNTING INSULATOR
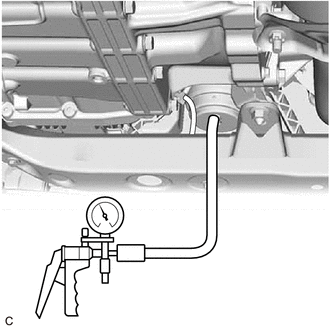
(a) Disconnect the vacuum hose from the front engine mounting insulator.
| (b) Using a vacuum pump, apply vacuum of 80 kPa (600 mmHg, 23.6 in.Hg) and wait for 1 minute. |
|
(c) Check that there is no change in the needle movement of the vacuum pump gauge.
OK:
Vacuum pressure holds.
(d) Check that there is no fluid leakage caused by a break in the diaphragm.
(e) Connect the vacuum hose to the front engine mounting insulator.
6. INSTALL REAR ENGINE UNDER COVER LH
Click here
7. INSTALL NO. 1 ENGINE UNDER COVER
Click here
8. INSTALL FRONT WHEEL OPENING EXTENSION PAD LH
Click here
9. INSTALL FRONT WHEEL OPENING EXTENSION PAD RH
Click here
REMOVAL
PROCEDURE
1. REMOVE VACUUM SWITCHING VALVE (for Active Control Engine Mount System)
Click here 
2. REMOVE V-BANK COVER SUB-ASSEMBLY
Click here
3. REMOVE FRONT WHEEL OPENING EXTENSION PAD LH
Click here
4. REMOVE FRONT WHEEL OPENING EXTENSION PAD RH
Click here
5. REMOVE NO. 1 ENGINE UNDER COVER
Click here
6. REMOVE REAR ENGINE UNDER COVER LH
Click here
7. REMOVE FRONT ENGINE MOUNTING INSULATOR
| (a) Disengage the 2 clamps to separate the vacuum hoses from the front engine mounting insulator. |
|
| (b) Disconnect the vacuum hose from the front engine mounting insulator. |
|
(c) Support the engine assembly with transaxle using a jack and wooden block.
 |
Wooden Block Placement Location |
| (d) Remove the 4 bolts and front engine mounting bracket. |
|
| (e) Remove the 3 nuts and front engine mounting insulator from the front frame assembly. |
|
| (f) Remove the nut and stay from the front engine mounting insulator. |
|
Toyota Avalon (XX50) 2019-2022 Service & Repair Manual > Seat: Rear Seat Assembly
Components COMPONENTS ILLUSTRATION *A for HV Model - - *1 LUGGAGE TRIM SERVICE HOLE COVER - - ILLUSTRATION *A w/ Seat Heater System - - *1 SPARE WHEEL COVER ASSEMBLY - - ILLUSTRATION *A for Gasoline Model *B for HV Model *C w/ Seat Heater System - - *1 LUGGAGE COMPARTMENT INNER TRIM PAD *2 REAR CENT ...