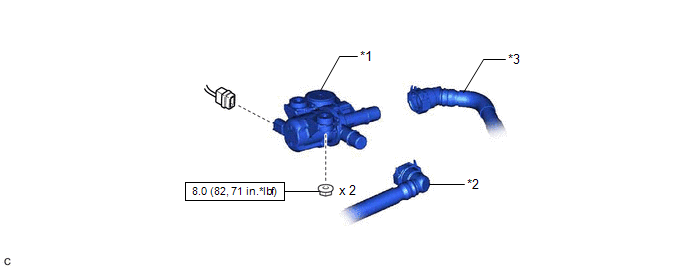
COMPONENTS
ILLUSTRATION
|
*1 | FUEL VAPOR CONTAINMENT VALVE (FUEL TANK SOLENOID MAIN VALVE ASSEMBLY) |
*2 | FUEL TANK VENT HOSE SUB-ASSEMBLY |
|
*3 | FUEL TANK VENT HOSE |
- | - |
 |
N*m (kgf*cm, ft.*lbf): Specified torque |
- | - |
INSPECTION
PROCEDURE
1. INSPECT FUEL VAPOR CONTAINMENT VALVE (FUEL TANK SOLENOID MAIN VALVE ASSEMBLY)
(a) Measure the resistance according to the value(s) in the table below.
Standard Resistance:
|
Tester Connection | Condition |
Specified Condition |
|---|---|---|
|
1 - 2 | 20°C (68°F) |
25 to 30 Ω |
If the result is not as specified, replace the fuel vapor containment valve (fuel tank solenoid main valve assembly).
INSTALLATION
PROCEDURE
1. INSTALL FUEL VAPOR CONTAINMENT VALVE (FUEL TANK SOLENOID MAIN VALVE ASSEMBLY)
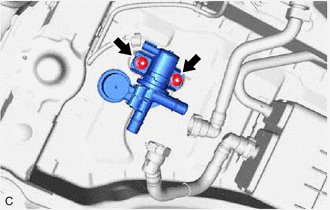
(a) Install the fuel vapor containment valve (fuel tank solenoid main valve assembly) to the vehicle body with the 2 nuts.
Torque:
8.0 N·m {82 kgf·cm, 71 in·lbf}
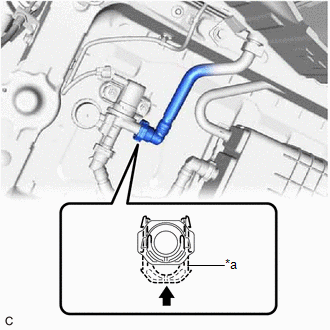
(b) Push the fuel tank vent hose onto the fuel vapor containment valve (fuel tank solenoid main valve assembly) and push in the retainer to engage the lock claws.
NOTICE:
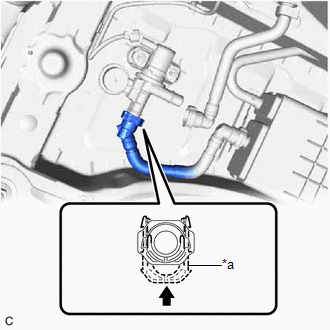
|
*a | Retainer |
 |
Push in |
(c) Connect the fuel vapor containment valve (fuel tank solenoid main valve assembly) connector.
(d) Push the fuel tank vent hose sub-assembly onto the fuel vapor containment valve (fuel tank solenoid main valve assembly) and push in the retainer to engage the lock claws.
NOTICE:
|
*a | Retainer |
|
|
Push in |
REMOVAL
PROCEDURE
1. REMOVE FUEL VAPOR CONTAINMENT VALVE (FUEL TANK SOLENOID MAIN VALVE ASSEMBLY)
| (a) Disconnect the fuel vapor containment valve (fuel tank solenoid main valve assembly) connector. |
|
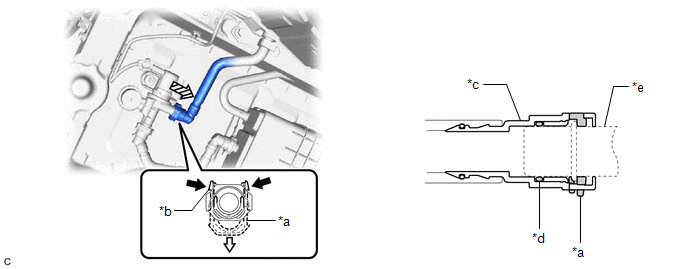
(b) Disconnect the fuel tank vent hose sub-assembly from the fuel vapor containment valve (fuel tank solenoid main valve assembly).
|
*a | Retainer |
*b | Tab |
|
*c | Tube Connector |
*d | O-ring |
|
*e | Pipe (Fuel Vapor Containment Valve (Fuel Tank Solenoid Main Valve Assembly)) |
- | - |
 |
Pinch |
 |
Pull |
 |
Pull off | - |
- |
NOTICE:
HINT:
Do not remove the retainer.
(1) Pinch the tabs of the retainer to disengage the lock claws and pull it down.
(2) Pull off the fuel tank vent hose sub-assembly.
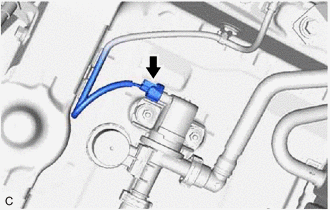
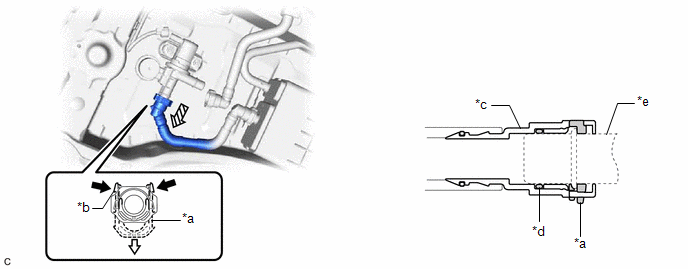
(c) Disconnect the fuel tank vent hose from the fuel vapor containment valve (fuel tank solenoid main valve assembly).
|
*a | Retainer |
*b | Tab |
|
*c | Tube Connector |
*d | O-ring |
|
*e | Pipe (Fuel Vapor Containment Valve (Fuel Tank Solenoid Main Valve Assembly)) |
- | - |
|
|
Pinch |
|
Pull |
|
|
Pull off | - |
- |
NOTICE:
HINT:
Do not remove the retainer.
(1) Pinch the tabs of the retainer to disengage the lock claws and pull it down.
(2) Pull off the fuel tank vent hose.
| (d) Remove the 2 nuts and fuel vapor containment valve (fuel tank solenoid main valve assembly) from the vehicle body. |
|
Toyota Avalon (XX50) 2019-2022 Service & Repair Manual > Airbag System(for Gasoline Model): System Diagram. Terminals Of Ecu. Lost Communication with Restraints Occupant Classification System Module (U0154)
System Diagram SYSTEM DIAGRAM Communication Table Transmitting ECU (Transmitter) Receiving ECU Signal Communication Method Airbag ECU Assembly Occupant Detection ECU Crash detection signal Acceleration signal CAN Airbag ECU Assembly ECM Crash detection signal Airbag ECU Assembly Combination Meter As ...