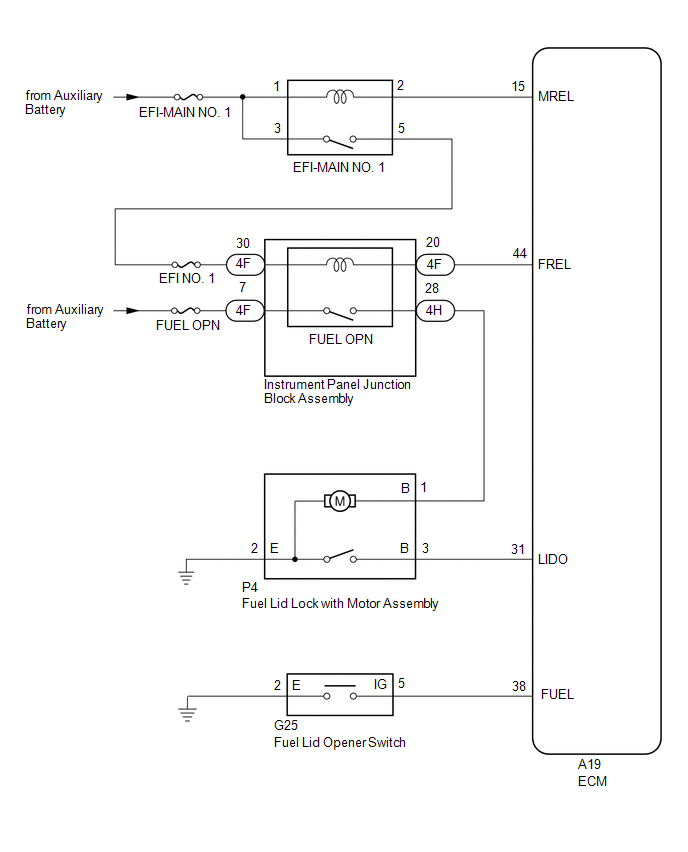
DESCRIPTION When the fuel
lid opener switch is pushed, a fuel lid opener switch signal is sent to
the ECM. The ECM turns on the FUEL OPN relay and EFI-MAIN relay, and the
fuel lid lock with motor assembly opens the fuel lid. When the fuel lid
is open, a fuel lid courtesy switch signal is output from the fuel lid
lock with motor assembly. WIRING DIAGRAM
 CAUTION / NOTICE / HINT
NOTICE: Inspect the fuses for circuits related to this system before performing the following procedure. PROCEDURE
| 1. |
CHECK FOR DTC (SFI SYSTEM) | (a) Connect the Techstream to the DLC3.
(b) Turn the power switch on (IG). (c) Turn the Techstream on. (d) Check for DTCs. Powertrain > Engine > Trouble Codes
OK: SFI system DTCs are not output.
| NG |
 | GO TO SFI SYSTEM |
|
OK |
 | |
| 2. |
PERFORM ACTIVE TEST USING TECHSTREAM (Activate the Fuel Filler Opener) |
(a) Enter the following menus: Powertrain / Engine / Active Test. (b) Perform the Active Test according to the display on the Techstream. Powertrain > Engine > Active Test
|
Tester Display | Measurement Item |
Control Range | Diagnostic Note | |
Activate the Fuel Filler Opener |
Fuel lid lock with motor assembly |
OFF/ON | - | Powertrain > Engine > Active Test
|
Tester Display | | Activate the Fuel Filler Opener |
OK: The fuel lid lock with motor assembly operates normally.
| NG |
| GO TO STEP 9 |
|
OK | |
| |
| 3. |
READ VALUE USING TECHSTREAM (Fuel Lid SW) |
(a) Enter the following menus: Powertrain / Engine / Data List. (b) Read the Data List according to the display on the Techstream. Powertrain > Engine > Data List
|
Tester Display | Measurement Item |
Range | Normal Condition |
Diagnostic Note | |
Fuel Lid SW | Fuel lid opener switch status |
Close or Open | Close: Fuel lid opener switch not pushed
Open: Fuel lid opener switch pushed |
- | Powertrain > Engine > Data List
|
Tester Display | | Fuel Lid SW |
OK: The Techstream display changes correctly in response to the operation of the fuel lid opener switch.
| NG |
| GO TO STEP 7 |
|
OK | |
| |
| 4. |
READ VALUE USING TECHSTREAM (Fuel Lid Sensor SW) |
(a) Read the Data List according to the display on the Techstream. Powertrain > Engine > Data List
|
Tester Display | Measurement Item |
Range | Normal Condition |
Diagnostic Note | |
Fuel Lid Sensor SW | Fuel lid courtesy switch status |
Close or Open | Close: Fuel lid closed
Open: Fuel lid open | - | Powertrain > Engine > Data List
|
Tester Display | | Fuel Lid Sensor SW |
OK: The
Techstream display changes correctly in response to the operation of
the fuel lid courtesy switch (fuel lid lock with motor assembly).
| OK |
| REPLACE ECM |
|
NG | |
| |
| 5. |
INSPECT FUEL LID LOCK WITH MOTOR ASSEMBLY |
(a) Remove the fuel lid lock with motor assembly. Click here
 (b) Inspect the fuel lid lock with motor assembly. (Fuel lid courtesy switch)
Click here
| NG |
| REPLACE FUEL LID LOCK WITH MOTOR ASSEMBLY |
|
OK | |
| |
| 6. |
CHECK HARNESS AND CONNECTOR (FUEL LID LOCK WITH MOTOR ASSEMBLY - ECM) |
(a) Disconnect the A19 ECM connector. (b) Measure the resistance according to the value(s) in the table below.
Standard Resistance: |
Tester Connection | Condition |
Specified Condition | |
P4-3 (B) - A19-31 (LIDO) |
Always | Below 1 Ω | |
P4-3 (B) or A19-31 (LIDO) - Body ground |
Always | 10 kΩ or higher |
| OK |
| REPLACE ECM |
| NG |
| REPAIR OR REPLACE HARNESS OR CONNECTOR |
| 7. |
INSPECT FUEL LID OPENER SWITCH | (a) Remove the fuel lid opener switch.
Click here (b) Inspect the fuel lid opener switch.
Click here
| NG |
| REPLACE FUEL LID OPENER SWITCH |
|
OK | |
| |
| 8. |
CHECK HARNESS AND CONNECTOR (FUEL LID OPENER SWITCH - ECM AND BODY GROUND) |
(a) Disconnect the A19 ECM connector. (b) Measure the resistance according to the value(s) in the table below.
Standard Resistance: |
Tester Connection | Condition |
Specified Condition | |
G25-5 (IG) - A19-38 (FUEL) |
Always | Below 1 Ω | |
G25-5 (IG) or A19-38 (FUEL) - Body ground |
Always | 10 kΩ or higher | |
G25-2 (E) - Body ground |
Always | Below 1 Ω |
| OK |
| REPLACE ECM |
| NG |
| REPAIR OR REPLACE HARNESS OR CONNECTOR |
| 9. |
INSPECT FUEL LID LOCK WITH MOTOR ASSEMBLY |
(a) Remove the fuel lid lock with motor assembly. Click here
(b) Inspect the fuel lid lock with motor assembly. (Motor operation)
Click here
| NG |
| REPLACE FUEL LID LOCK WITH MOTOR ASSEMBLY |
|
OK | |
| |
| 10. |
CHECK HARNESS AND CONNECTOR (INSTRUMENT PANEL JUNCTION BLOCK ASSEMBLY - EFI-MAIN RELAY AND AUXILIARY BATTERY) |
| (a) Disconnect the 4F instrument panel junction block assembly connector. |
 |
|
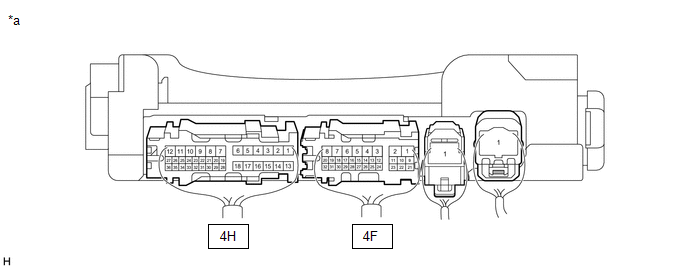
*a | Front view of wire harness connector
(to Instrument Panel Junction Block Assembly) | | |
(b) Measure the voltage according to the value(s) in the table below. Standard Voltage: |
Tester Connection | Condition |
Specified Condition | |
4F-7 - Body ground | Power switch on (IG) |
11 to 14 V | |
4F-30 - Body ground | Power switch on (IG) |
11 to 14 V |
| NG |
| REPAIR OR REPLACE HARNESS OR CONNECTOR |
|
OK | |
| |
| 11. |
CHECK HARNESS AND CONNECTOR (INSTRUMENT PANEL JUNCTION BLOCK ASSEMBLY - ECM) |
(a) Disconnect the A19 ECM connector. (b) Measure the resistance according to the value(s) in the table below.
Standard Resistance: |
Tester Connection | Condition |
Specified Condition | |
4F-20 - A19-44 (FREL) |
Always | Below 1 Ω | |
4F-20 or A19-44 (FREL) - Body ground |
Always | 10 kΩ or higher |
| NG |
| REPAIR OR REPLACE HARNESS OR CONNECTOR |
|
OK | |
| |
| 12. |
CHECK HARNESS AND CONNECTOR (FUEL LID LOCK WITH MOTOR ASSEMBLY - INSTRUMENT PANEL JUNCTION BLOCK ASSEMBLY AND BODY GROUND) |
(a) Disconnect the 4H instrument panel junction block assembly connector.
(b) Measure the resistance according to the value(s) in the table below.
Standard Resistance: |
Tester Connection | Condition |
Specified Condition | |
4H-28 - P4-1 (B) | Always |
Below 1 Ω | |
4H-28 or P4-1 (B) - Body ground |
Always | 10 kΩ or higher | |
P4-2 (E) - Body ground |
Always | Below 1 Ω |
| NG |
| REPAIR OR REPLACE HARNESS OR CONNECTOR |
|
OK | |
| |
(a) Connect the A19 ECM connector.
(b) Connect the 4F and 4H instrument panel junction block assembly connectors.
(c) Measure the voltage according to the value(s) in the table below.
|
*a | Component with harness connected
(Instrument Panel Junction Block Assembly) |
- | - |
Standard Voltage: |
Tester Connection | Condition |
Specified Condition | |
4F-20 - Body ground | Power switch on (IG) and fuel lid opener switch not pressed |
11 to 14 V | |
Power switch on (IG) and fuel lid opener switch pressed |
Below 1 V | |
4H-28 - Body ground | Power switch on (IG) and fuel lid opener switch not pressed → fuel lid opener switch pressed |
Below 1 V → 11 to 14 V |
|
Result | Proceed to | |
The result for terminal 4F-20 (with power switch on (IG) and fuel lid opener switch not pressed) is not as specified |
A | | The result for terminal 4H-28 is not as specified | |
The result for terminal 4F-20 (with power switch on (IG) and fuel lid opener switch pressed) is not as specified |
B |
| A |
| REPLACE INSTRUMENT PANEL JUNCTION BLOCK ASSEMBLY |
| B |
| REPLACE ECM | | 

