Toyota Avalon (XX50) 2019-2022 Service & Repair Manual: Removal

REMOVAL

CAUTION / NOTICE / HINT

The necessary procedures (adjustment, calibration, initialization or registration) that must be performed after parts are removed and installed, or replaced during headlight assembly removal/installation are shown below.

Necessary Procedure After Parts Removed/Installed/Replaced (for Gasoline Model)

Replaced Part or Performed Procedure

Necessary Procedure

Effect/Inoperative Function When Necessary Procedures are not Performed

Link

Front bumper assembly

  • Measurement of ultrasonic sensor detection angle
  • Ultrasonic sensor detection angle registration
  • Intelligent Clearance Sonar System
  • Intuitive Parking Assist System

Front television camera view adjustment

Panoramic View Monitor System

  • Headlight assembly LH
  • Headlight ECU sub-assembly LH

Synchronize the vehicle information

Lighting system (for Gasoline Model with Cornering Light)

Necessary Procedure After Parts Removed/Installed/Replaced (for HV Model)

Replaced Part or Performed Procedure

Necessary Procedure

Effect/Inoperative Function When Necessary Procedures are not Performed

Link

Front bumper assembly

  • Measurement of ultrasonic sensor detection angle
  • Ultrasonic sensor detection angle registration
  • Intelligent Clearance Sonar System
  • Intuitive Parking Assist System

Front television camera view adjustment

Panoramic View Monitor System

  • Headlight assembly LH
  • Headlight ECU sub-assembly LH

Synchronize the vehicle information

Lighting system (for HV Model with Cornering Light)

HINT:

  • Use the same procedure for the RH side and LH side.
  • The following procedure is for the LH side.

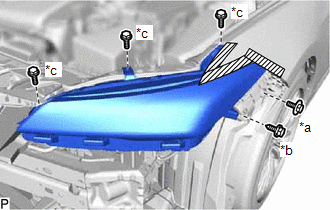
PROCEDURE

1. REMOVE FRONT BUMPER ASSEMBLY

Click here

2. REMOVE HEADLIGHT ASSEMBLY

(a) Apply protective tape around the headlight assembly as shown in the illustration.

Protective Tape

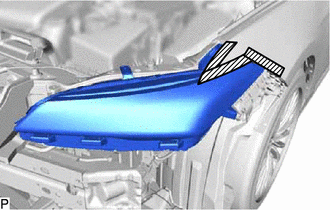
(b) w/o Cornering Light:

(1) Remove the bolt (A) , bolt (B) and 3 screws.

*a

Bolt (A)

*b

Bolt (B)

*c

Screw

(2) Disengage the guide to separate the headlight assembly as shown in the illustration.

Remove in this Direction

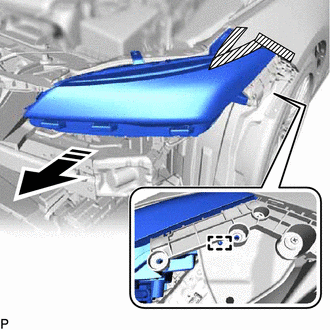
(3) Disconnect the connector to remove the headlight assembly.

(c) w/ Cornering Light:

(1) Disengage the claw, pull down the connector lock lever as shown in the illustration and disconnect the connector.

*a

Connector Lock Lever

Disconnect in this Direction

(2) Remove the bolt (A) , bolt (B) and 3 screws.

*a

Bolt (A)

*b

Bolt (B)

*c

Screw

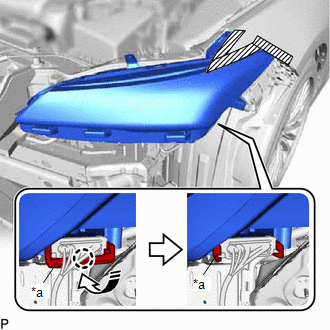
(3) Disengage the guide to remove the headlight assembly as shown in the illustration.

Remove in this Direction

    Reassembly

    Headlight Dimmer Switch

    See More:

    Toyota Avalon (XX50) 2019-2022 Service & Repair Manual > Pre-collision System(for Hv Model): Parts Location
    PARTS LOCATION ILLUSTRATION *1 FORWARD RECOGNITION CAMERA *2 MILLIMETER WAVE RADAR SENSOR ASSEMBLY *3 BRAKE BOOSTER WITH MASTER CYLINDER ASSEMBLY - SKID CONTROL ECU - - ILLUSTRATION *1 DRIVING SUPPORT ECU ASSEMBLY *2 COMBINATION METER ASSEMBLY - MULTI-INFORMATION DISPLAY - PCS WARNING LIGHT *3 STEER ...

    Toyota Avalon (XX50) 2019-2022 Owners Manual

    Toyota Avalon (XX50) 2019-2022 Service & Repair Manual

    © 2024 Copyright www.tavalon.net
    0.0121