DESCRIPTION When the automatic high beam system is on, the main body ECU (multiplex network body ECU) illuminates the auto high beam switch indicator. WIRING DIAGRAM 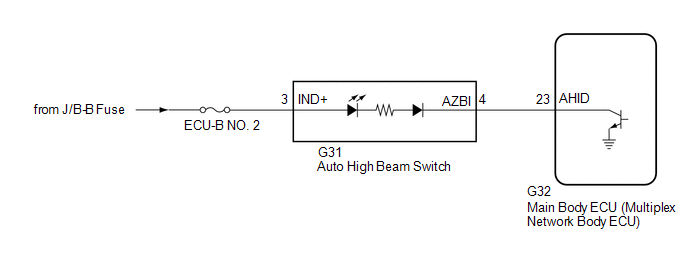 CAUTION / NOTICE / HINT NOTICE:
PROCEDURE
(a) Connect the Techstream to the DLC3. (b) Turn the engine switch on (IG). (c) Turn the Techstream on. (d) Enter the following menus: Body Electrical / Main Body / Active Test. (e) Perform the Active Test according to the display on the Techstream. Body Electrical > Main Body > Active Test
OK: Auto high beam switch indicator light illuminates.
(a) Remove the auto high beam switch. Click here (b) Inspect the auto high beam switch. Click here
(a) Measure the voltage according to the value(s) in the table below. Standard Voltage:
(a) Disconnect the G32 main body ECU (multiplex network body ECU) connector. (b) Measure the resistance according to the value(s) in the table below. Standard Resistance:
|
Toyota Avalon (XX50) 2019-2022 Service & Repair Manual > Can Communication System(for Hv Model): Power Steering ECU Communication Stop Mode
DESCRIPTION Detection Item Symptom Trouble Area Power Steering ECU Communication Stop Mode Any of the following conditions are met: Communication stop for "Power Steering (EPS)" is indicated on the "Communication Bus Check" screen of the Techstream. Click here Communication stop history for "Power S ...


