Toyota Avalon (XX50) 2019-2022 Service & Repair Manual: Cornering Light Circuit

DESCRIPTION

The headlight ECU sub-assembly controls the cornering lights.

WIRING DIAGRAM

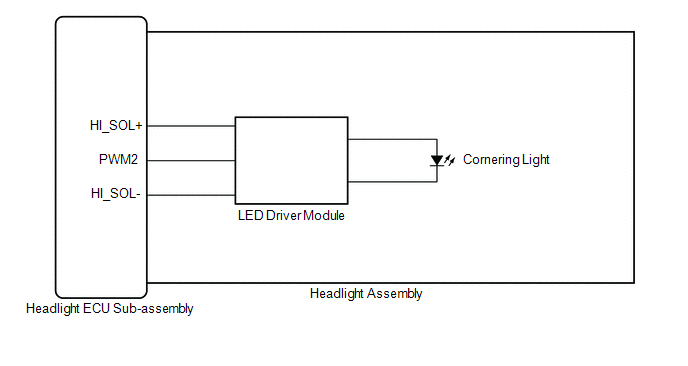
CAUTION / NOTICE / HINT

NOTICE:

  • If the headlight ECU sub-assembly LH has been replaced, it is necessary to synchronize the vehicle information the headlight ECU sub-assembly LH.

    Click here

  • If the headlight assembly LH has been replaced, it is necessary to synchronize the vehicle information the headlight ECU sub-assembly LH.

    Click here

PROCEDURE

1.

CHECK LIGHTS

(a) Check the illumination of each cornering lights.

Result

Proceed to

LH side cornering light does not illuminate

A

RH side cornering light does not illuminate

B

B

GO TO STEP 5

A

2.

PERFORM ACTIVE TEST USING TECHSTREAM

(a) Connect the Techstream to the DLC3.

(b) Turn the engine switch on (IG).

(c) Turn the Techstream on.

(d) Enter the following menus: Body Electrical / HL AutoLeveling / Active Test.

(e) Perform the Active Test according to the display on the Techstream.

Body Electrical > HL AutoLeveling > Active Test

Tester Display

Measurement Item

Control Range

Diagnostic Note

Cornering Light/Front Side Illuminate Light

Cornering light/front side illuminate light

OFF or ON

-

Body Electrical > HL AutoLeveling > Active Test

Tester Display

Cornering Light/Front Side Illuminate Light

OK:

Cornering light turn on.

OK

PROCEED TO NEXT SUSPECTED AREA SHOWN IN PROBLEM SYMPTOMS TABLE

NG

3.

CHECK HEADLIGHT ASSEMBLY LH

(a) Remove each headlight ECU sub-assembly, interchange the headlight assembly LH with RH and connect the connectors.

Click here

NEXT

4.

CHECK OPERATION (CORNERING LIGHT)

(a) Check that the cornering light operates normally.

Click here

OK:

Cornering light operates normally.

OK

REPLACE HEADLIGHT ECU SUB-ASSEMBLY LH

NG

REPLACE HEADLIGHT ASSEMBLY LH

5.

PERFORM ACTIVE TEST USING TECHSTREAM

(a) Connect the Techstream to the DLC3.

(b) Turn the engine switch on (IG).

(c) Turn the Techstream on.

(d) Enter the following menus: Body Electrical / HL AutoLeveling (Sub) / Active Test.

(e) Perform the Active Test according to the display on the Techstream.

Body Electrical > HL AutoLeveling (Sub) > Active Test

Tester Display

Measurement Item

Control Range

Diagnostic Note

Cornering Light/Front Side Illuminate Light

Cornering light/front side illuminate light

OFF or ON

-

Body Electrical > HL AutoLeveling (Sub) > Active Test

Tester Display

Cornering Light/Front Side Illuminate Light

OK:

Cornering light turn on.

OK

PROCEED TO NEXT SUSPECTED AREA SHOWN IN PROBLEM SYMPTOMS TABLE

NG

6.

CHECK HEADLIGHT ASSEMBLY RH

(a) Remove each headlight ECU sub-assembly, interchange the headlight assembly RH with LH and connect the connectors.

Click here

NEXT

7.

CHECK OPERATION (CORNERING LIGHT)

(a) Check that the cornering light operates normally.

Click here

OK:

Cornering light operates normally.

OK

REPLACE HEADLIGHT ECU SUB-ASSEMBLY RH

NG

REPLACE HEADLIGHT ASSEMBLY RH

    Left Headlight ECU Variation Error (B2456)

    Customize Parameters

    See More:

    Toyota Avalon (XX50) 2019-2022 Service & Repair Manual > Luggage Compartment Door Opener System(for Gasoline Model): Data List / Active Test
    DATA LIST / ACTIVE TEST DATA LIST NOTICE: In the table below, the values listed under "Normal Condition" are reference values. Do not depend solely on these reference values when deciding whether a part is faulty or not. HINT: Using the Techstream to read the Data List allows the values or states of ...

    Toyota Avalon (XX50) 2019-2022 Owners Manual

    Toyota Avalon (XX50) 2019-2022 Service & Repair Manual

    © 2024 Copyright www.tavalon.net
    0.0209