Components
COMPONENTS
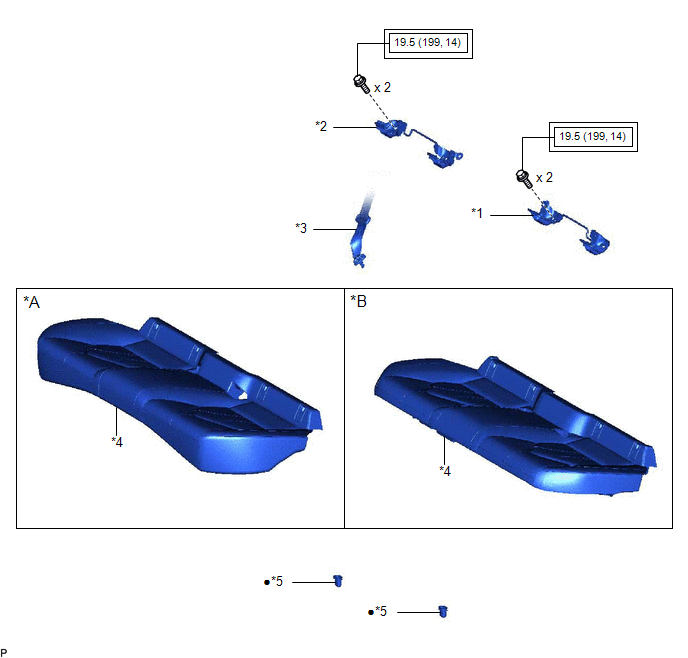
ILLUSTRATION
|
*A | for Gasoline Model |
*B | for HV Model |
|
*1 | CHILD RESTRAINT SEAT ANCHOR BRACKET SUB-ASSEMBLY LH |
*2 | CHILD RESTRAINT SEAT ANCHOR BRACKET SUB-ASSEMBLY RH |
|
*3 | REAR CENTER SEAT OUTER BELT ASSEMBLY |
*4 | REAR SEAT CUSHION ASSEMBLY |
|
*5 | REAR SEAT CUSHION LOCK HOOK |
- | - |
 |
Tightening torque for "Major areas involving basic vehicle performance such as moving/turning/stopping": N*m (kgf*cm, ft.*lbf) |
● | Non-reusable part |
Installation
INSTALLATION
PROCEDURE
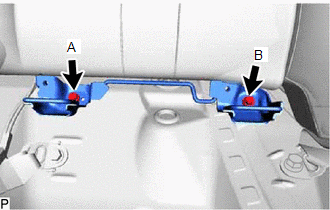
1. INSTALL CHILD RESTRAINT SEAT ANCHOR BRACKET SUB-ASSEMBLY LH
| (a) Temporarily install the child restraint seat anchor bracket sub-assembly LH with the 2 bolts. |
|
(b) Fully tighten the bolt (A), and then the bolt (B) to install the child restraint seat anchor bracket sub-assembly LH.
Torque:
19.5 N·m {199 kgf·cm, 14 ft·lbf}
(c) Engage each clamp.
2. INSTALL CHILD RESTRAINT SEAT ANCHOR BRACKET SUB-ASSEMBLY RH
HINT:
Use the same procedure as for the LH side.
3. INSTALL REAR SEAT CUSHION LOCK HOOK
Click here 
4. INSTALL REAR SEAT CUSHION ASSEMBLY
Click here
5. CONNECT REAR CENTER SEAT OUTER BELT ASSEMBLY
Click here
Removal
REMOVAL
PROCEDURE
1. DISCONNECT REAR CENTER SEAT OUTER BELT ASSEMBLY
Click here

2. REMOVE REAR SEAT CUSHION ASSEMBLY
Click here
3. REMOVE REAR SEAT CUSHION LOCK HOOK
Click here
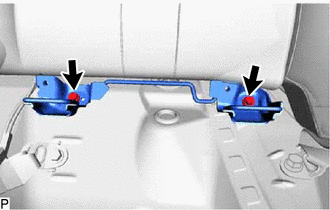
4. REMOVE CHILD RESTRAINT SEAT ANCHOR BRACKET SUB-ASSEMBLY LH
(a) Disengage each clamp.
| (b) Remove the 2 bolts and child restraint seat anchor bracket sub-assembly LH. |
|
5. REMOVE CHILD RESTRAINT SEAT ANCHOR BRACKET SUB-ASSEMBLY RH
HINT:
Use the same procedure as for the LH side.
Toyota Avalon (XX50) 2019-2022 Service & Repair Manual > Park Assist / Monitoring: Rear Crossing Traffic Alert Buzzer
Components COMPONENTS ILLUSTRATION *A for HV Model - - *1 LUGGAGE TRIM SERVICE HOLE COVER - - ILLUSTRATION *A w/ Seat Heater System - - *1 SPARE WHEEL COVER ASSEMBLY - - ILLUSTRATION *A for Gasoline Model *B for HV Model *C w/ Seat Heater System - - *1 LUGGAGE COMPARTMENT INNER TRIM PAD *2 REAR CENT ...