INSTALLATION PROCEDURE 1. INSTALL REAR SEAT BELT RETRACTOR COVER (a) Install the seat belt retractor cover as shown in the illustration. 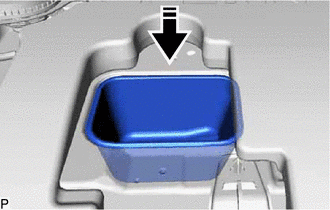
2. INSPECT REAR CENTER SEAT OUTER BELT ASSEMBLY Click here 3. INSTALL REAR CENTER SEAT OUTER BELT ASSEMBLY
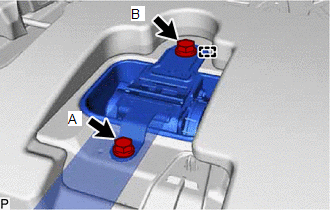
(b) Fully tighten the bolt (A), and then the bolt (B) to install the rear center seat outer belt assembly. Torque: Bolt (A) : 12.5 N·m {127 kgf·cm, 9 ft·lbf} Bolt (B) : 42 N·m {428 kgf·cm, 31 ft·lbf} (c) Check that the ELR locks. NOTICE: This check should be performed with the rear center seat outer belt assembly installed to the vehicle. (1) With the rear center seat outer belt assembly installed to the vehicle, check that the belt locks when it is pulled out quickly. 4. INSTALL PACKAGE TRAY TRIM PANEL ASSEMBLY Click here 5. INSTALL REAR SEAT SHOULDER BELT COVER Click here 6. INSTALL CENTER STOP LIGHT SET Click here 7. CONNECT REAR SEAT 3 POINT TYPE BELT ASSEMBLY LH Click here 8. CONNECT REAR SEAT 3 POINT TYPE BELT ASSEMBLY RH HINT: Use the same procedure as for the LH side. 9. INSTALL ROOF SIDE INNER GARNISH LH Click here 10. INSTALL ROOF SIDE INNER GARNISH RH HINT: Use the same procedure as for the LH side. 11. INSTALL ROOF SIDE RAIL GARNISH ASSEMBLY LH Click here 12. INSTALL ROOF SIDE RAIL GARNISH ASSEMBLY RH HINT: Use the same procedure as for the LH side. 13. CONNECT REAR DOOR OPENING TRIM WEATHERSTRIP LH Click here 14. CONNECT REAR DOOR OPENING TRIM WEATHERSTRIP RH Click here 15. INSTALL REAR SIDE SEATBACK ASSEMBLY LH Click here 16. INSTALL REAR SIDE SEATBACK ASSEMBLY RH HINT: Use the same procedure as for the LH side. 17. INSTALL REAR SEAT CUSHION LOCK HOOK Click here 18. INSTALL REAR SEAT CUSHION ASSEMBLY Click here 19. CONNECT REAR CENTER SEAT OUTER BELT ASSEMBLY Click here 20. CONNECT CABLE TO NEGATIVE AUXILIARY BATTERY TERMINAL for A25A-FXS: Click here for 2GR-FKS: Click here 21. INSTALL LUGGAGE COMPARTMENT INNER TRIM PAD (w/ Seat Heater System) Click here 22. INSTALL SPARE WHEEL COVER ASSEMBLY (w/ Seat Heater System) Click here 23. INSTALL LUGGAGE TRIM SERVICE HOLE COVER (for HV Model) Click here 24. PERFORM DIAGNOSTIC SYSTEM CHECK for HV Model: Click here for Gasoline Model: Click here 25. INSPECT SRS WARNING LIGHT for HV Model: Click here for Gasoline Model: Click here |
Toyota Avalon (XX50) 2019-2022 Service & Repair Manual > Audio And Visual System(for Hv Model): AVC-LAN Circuit
DESCRIPTION Each unit of the audio and visual system connected to the AVC-LAN (communication bus) transmits signals via AVC-LAN communication. If a short to +B or short to ground occurs in an AVC-LAN communication line, the audio and visual system will not function normally because communication is ...