Components COMPONENTS ILLUSTRATION 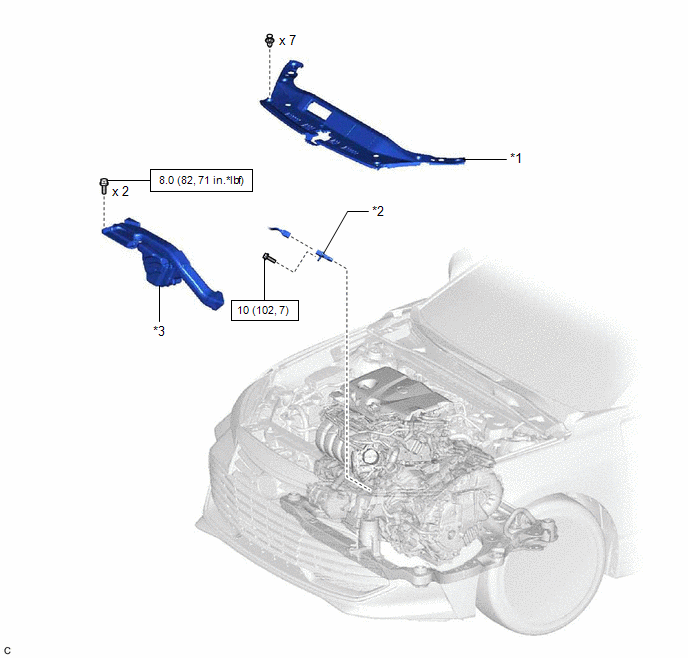
Installation INSTALLATION CAUTION / NOTICE / HINT NOTICE: This procedure includes the installation of small-head bolts. Refer to Small-Head Bolts of Basic Repair Hint to identify the small-head bolts. Click here
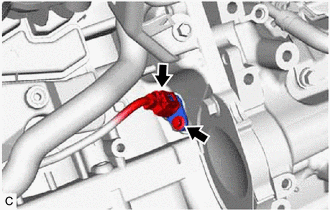
PROCEDURE 1. INSTALL CRANKSHAFT POSITION SENSOR (a) Apply a light coat of engine oil to the O-ring of the crankshaft position sensor. NOTICE: If reusing the crankshaft position sensor, be sure to inspect the O-ring. (b) Using an 8 mm socket wrench, install the crankshaft position sensor to the cylinder block sub-assembly with the bolt. Torque: 10 N·m {102 kgf·cm, 7 ft·lbf} NOTICE:
(c) Connect the crankshaft position sensor connector. 2. INSTALL INLET AIR CLEANER ASSEMBLY Click here 3. INSTALL COOL AIR INTAKE DUCT SEAL Click here Removal REMOVAL CAUTION / NOTICE / HINT NOTICE: This procedure includes the removal of small-head bolts. Refer to Small-Head Bolts of Basic Repair Hint to identify the small-head bolts. Click here
PROCEDURE 1. REMOVE COOL AIR INTAKE DUCT SEAL Click here 2. REMOVE INLET AIR CLEANER ASSEMBLY Click here 3. REMOVE CRANKSHAFT POSITION SENSOR
(b) Using an 8 mm socket wrench, remove the bolt and crankshaft position sensor from the cylinder block sub-assembly. NOTICE: If the crankshaft position sensor has been struck or dropped, replace it. |
Toyota Avalon (XX50) 2019-2022 Service & Repair Manual > Electronically Controlled Brake System(for Hv Model): How To Proceed With Troubleshooting
CAUTION / NOTICE / HINT HINT: *: Use the Techstream. PROCEDURE 1. VEHICLE BROUGHT TO WORKSHOP NEXT 2. CUSTOMER PROBLEM ANALYSIS (a) Interview the customer and confirm the problem. Click here NEXT 3. CHECK DTC AND FREEZE FRAME DATA* (a) Check and record DTCs and Freeze Frame Data. for DTC Check / Cle ...