REMOVAL CAUTION / NOTICE / HINT The necessary procedures (adjustment, calibration, initialization, or registration) that must be performed after parts are removed and installed, or replaced during active noise control microphone removal/installation are shown below. Necessary Procedure After Parts Removed/Installed/Replaced (for Gasoline Model)
CAUTION: Some of these service operations affect the SRS airbag system. Read the precautionary notices concerning the SRS airbag system before servicing. Click here
 Necessary Procedure After Parts Removed/Installed/Replaced (for HV Model) Necessary Procedure After Parts Removed/Installed/Replaced (for HV Model)
CAUTION: Some of these service operations affect the SRS airbag system. Read the precautionary notices concerning the SRS airbag system before servicing. Click here
PROCEDURE 1. REMOVE ROOF HEADLINING ASSEMBLY Click here
2. REMOVE ACTIVE NOISE CONTROL MICROPHONE WITH COVER HINT: Use the same procedure for all active noise control microphone with covers.
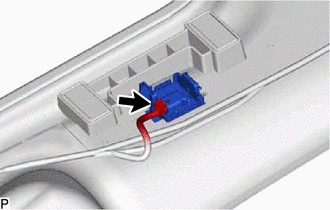
(b) Disengage the 2 claws to remove the active noise control microphone with cover as shown in the illustration. 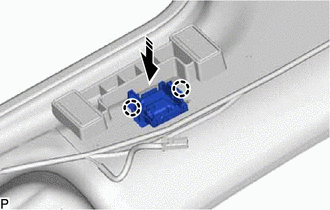
3. REMOVE ACTIVE NOISE CONTROL MICROPHONE HINT: Use the same procedure for all active noise control microphones. (a) Disengage the 2 claws to remove the active noise control microphone from the roof headlining holder cover as shown in the illustration. 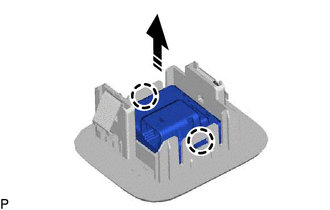
| |||||||||||||||||||||||||||||||||||||||||||||||||||||||
Toyota Avalon (XX50) 2019-2022 Service & Repair Manual > Sfi System: Crankshaft Position - Camshaft Position Correlation Bank 1 Sensor A (P001600)
DESCRIPTION Refer to DTC P001001. Click here DTC No. Detection Item DTC Detection Condition Trouble Area MIL Memory Note P001600 Crankshaft Position - Camshaft Position Correlation Bank 1 Sensor A Deviation in the crankshaft position sensor signal and camshaft position sensor (for intake camshaft) s ...