REMOVAL CAUTION / NOTICE / HINT The necessary procedures (adjustment, calibration, initialization, or registration) that must be performed after parts are removed and installed, or replaced during outer rear view mirror assembly with cover removal/installation are shown below. Necessary Procedure After Parts Removed/Installed/Replaced (for Gasoline Model)
HINT:
PROCEDURE 1. REMOVE FRONT DOOR ARMREST COVER SUB-ASSEMBLY Click here 2. REMOVE FRONT DOOR TRIM POCKET COVER Click here 3. REMOVE MULTIPLEX NETWORK MASTER SWITCH ASSEMBLY WITH FRONT DOOR UPPER ARMREST BASE PANEL (for Driver Side) Click here 4. REMOVE POWER WINDOW REGULATOR SWITCH ASSEMBLY WITH FRONT DOOR UPPER ARMREST BASE PANEL (for Front Passenger Side) Click here 5. REMOVE COURTESY LIGHT ASSEMBLY Click here 6. REMOVE FRONT DOOR TRIM BOARD SUB-ASSEMBLY Click here 7. REMOVE HOLE PLUG
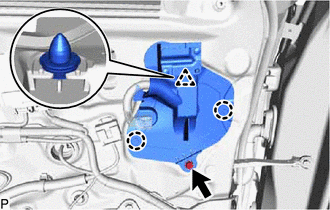
8. REMOVE OUTER MIRROR INSTALL HOLE COVER
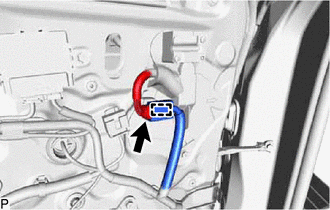
(b) Disengage the clamp.
(d) Disengage the clip and 2 claws to remove the outer mirror install hole cover. 9. REMOVE OUTER REAR VIEW MIRROR ASSEMBLY WITH COVER
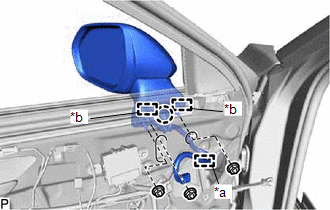
(b) Remove the 3 nuts. (c) Disengage the claw and 2 guides, and remove the outer rear view mirror assembly with cover. |
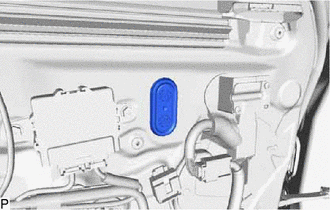
Toyota Avalon (XX50) 2019-2022 Service & Repair Manual > Smart Key System(for Start Function, Hv Model): Short to GND in Immobiliser System Power Source Circuit (B278A)
DESCRIPTION When there is a short to GND in the power supply for the transponder key amplifier of the power switch, the certification ECU (smart key ECU assembly) stores this DTC. DTC No. Detection Item DTC Detection Condition Trouble Area Note B278A Short to GND in Immobiliser System Power Source C ...