Toyota Avalon (XX50) 2019-2022 Service & Repair Manual: Installation

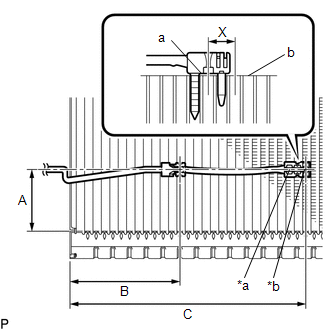
INSTALLATION

PROCEDURE

1. INSTALL NO. 1 COOLER THERMISTOR

(a) for 2GR-FKS:

(1) Install the No. 1 cooler thermistor as shown in the illustration.

Installation Position:

Part

Length

A

50.0 mm (1.97 in.)

B

61.1 mm (2.41 in.)

NOTICE:

  • Be sure to insert the No. 1 cooler thermistor only once because reinserting it into the same position will not allow it to be firmly secured.
  • When reusing the No. 1 cooler evaporator sub-assembly, insert the No. 1 cooler thermistor one row next to the one that has been used previously (X in the illustration).
  • After inserting the No. 1 cooler thermistor, do not apply excessive force to the wire.
  • Directly insert the No. 1 cooler thermistor until the edge of the plastic case "a" comes into contact with the No. 1 cooler evaporator sub-assembly "b".

*a

Securing Part

*b

Sensor Part

(b) for A25A-FXS:

(1) Install the No. 1 cooler thermistor as shown in the illustration.

Installation Position:

Part

Length

A

50.0 mm (1.97 in.)

B

87.9 mm (3.46 in.)

C

188.3 mm (7.41 in.)

NOTICE:

  • Be sure to insert the No. 1 cooler thermistor only once because reinserting it into the same position will not allow it to be firmly secured.
  • When reusing the No. 1 cooler evaporator sub-assembly, insert the No. 1 cooler thermistor one row next to the one that has been used previously (X in the illustration).
  • After inserting the No. 1 cooler thermistor, do not apply excessive force to the wire.
  • Directly insert the No. 1 cooler thermistor until the edge of the plastic case "a" comes into contact with the No. 1 cooler evaporator sub-assembly "b".

*a

Securing Part

*b

Sensor Part

2. INSTALL NO. 1 COOLER EVAPORATOR SUB-ASSEMBLY

for 2GR-FKS:

Click here

for A25A-FXS:

Click here

3. INSTALL COOLER EXPANSION VALVE

for 2GR-FKS:

Click here

for A25A-FXS:

Click here

4. INSTALL COOLING UNIT PARTS

Click here

5. INSTALL HEATER RADIATOR UNIT SUB-ASSEMBLY

Click here

6. INSTALL HEATER CLAMP

Click here

7. INSTALL HEATER PIPE GROMMET

Click here

8. INSTALL NO. 1 AIR CONDITIONING RADIATOR DAMPER SERVO SUB-ASSEMBLY

Click here

9. INSTALL AIR CONDITIONING HARNESS ASSEMBLY

for 2GR-FKS:

Click here

for A25A-FXS:

Click here

10. INSTALL NO. 2 AIR DUCT SUB-ASSEMBLY

Click here

11. INSTALL NO. 4 HEATER TO REGISTER DUCT SUB-ASSEMBLY

Click here

12. INSTALL BLOWER ASSEMBLY

Click here

    Inspection

    Removal

    See More:

    Toyota Avalon (XX50) 2019-2022 Service & Repair Manual > Electronically Controlled Brake System(for Hv Model): Dtc Check / Clear
    DTC CHECK / CLEAR HINT: DTCs which are stored in the skid control ECU (brake booster with master cylinder assembly) can be displayed on the Techstream. The Techstream can display the current, pending and permanent DTCs. If a malfunction is detected during the current driving cycle, current and perma ...

    Toyota Avalon (XX50) 2019-2022 Owners Manual

    Toyota Avalon (XX50) 2019-2022 Service & Repair Manual

    © 2024 Copyright www.tavalon.net
    0.0158