Toyota Avalon (XX50) 2019-2022 Service & Repair Manual: Dtc Check / Clear

DTC CHECK / CLEAR

NOTICE:

When the diagnosis system is changed from normal mode to check mode or vice versa, all DTCs and Freeze Frame Data recorded in normal mode are cleared. Before changing modes, always check and make a note of DTCs and Freeze Frame Data.

HINT:

  • DTCs which are stored in the ECM can be displayed on the Techstream. The Techstream can display the confirmed, pending and permanent DTCs.
  • If a malfunction is detected during the current driving cycle, confirmed and permanent DTCs are stored.
  • Some DTCs are not stored if the ECM does not detect the same malfunction again during a second consecutive driving cycle. However, such malfunctions, detected on only one occasion, are stored as pending DTCs.
  • Confirmed and pending DTCs can be cleared by using the Techstream or by disconnecting the cable from the negative (-) auxiliary battery terminal. However, permanent DTCs cannot be cleared using either of these two methods.
  • After clearing current DTCs using the Techstream (or by disconnecting the cable from the negative (-) auxiliary battery terminal), permanent DTCs can be cleared when the universal trip is performed and then the system is determined to be normal for the relevant DTCs. The driving pattern to obtain a normal judgment is described under the "Confirmation Driving Pattern" for the respective DTC.

    To clear permanent DTCs, all of the following conditions must be are met:

    • There is a history that universal trip driving was performed.
    • The vehicle has been judged as normal for 2 trips. (Normal judgment does not have to be performed in 2 consecutive trip, but normal judgment should occur in the latest trip.) (not for misfire and fuel system DTCs)
    • No malfunctions are detected.
2 Trip Detection Logic Examples

Pending DTC

Store condition

Malfunction detected

Clear condition

System determined to be normal

or

DTCs cleared using Techstream

or

Cable disconnected from negative (-) auxiliary battery terminal

Confirmed DTC

Store condition

Malfunction detected (2nd trip)

Clear condition

No malfunctions in 40 driving cycles

or

DTCs cleared using Techstream

or

Cable disconnected from negative (-) auxiliary battery terminal

Permanent DTC

Store condition

Malfunction detected (2nd trip)

Clear condition

Power switch turned to on (IG) after normal judgment obtained in 3 consecutive driving cycles

or

After DTCs cleared using Techstream or cable disconnected from negative (-) auxiliary battery terminal, universal trip performed and normal judgment obtained for 2 trips (not for misfire and fuel system DTCs)

or

After DTCs cleared using Techstream or cable disconnected from negative (-) auxiliary battery terminal, malfunction not detected when universal trip driving performed (misfire and fuel system DTCs)

MIL

ON

Malfunction detected (2nd trip)

OFF

Power switch turned to on (IG) after normal judgment obtained in 3 consecutive driving cycles

or

DTCs cleared using Techstream

or

Cable disconnected from negative (-) auxiliary battery terminal

HINT:

  • Obtaining a normal judgment and performing a universal trip driving pattern can be done in the same driving cycle or in different driving cycles.
  • It is unnecessary to obtain a normal judgment if the output DTCs are misfire or fuel system DTCs.

CHECK DTC

(a) Connect the Techstream to the DLC3.

(b) Turn the power switch on (IG).

(c) Turn the Techstream on.

(d) Enter the following menus: Powertrain / Engine / Trouble Codes.

Powertrain > Engine > Trouble Codes

(e) Check the DTC(s) and Freeze Frame Data, and then write them down.

Techstream Display

Description

Test Failed

Shows the malfunction judgment results during the current trip.

Pending

Shows the malfunction judgment results up to now. (Indicates the possibility of a malfunction when no DTC is confirmed.)

Confirmed

Shows the DTCs confirmed up to now. (The number of current trips differs for each DTC.)

(f) Check the details of the DTC(s).

Click here

CHECK TIME STAMP

HINT:

By checking Time Stamp, the time and order in which DTCs were stored in an ECU can be checked.

(a) Connect the Techstream to the DLC3.

(b) Turn the power switch on (IG).

(c) Turn the Techstream on.

(d) Enter the following menus: Health Check.

(e) Perform the following steps when the data setting screen is displayed.

(f) Select the systems for which to perform Health Check and check for time stamp data.

Selectable items:
  • Powertrain
  • Chassis
  • Body
  • Store All Data

(g) Select "Yes" when "Do you want to store time stamp data?" is displayed.

HINT:

If "Yes" is not selected, time stamp data will not be stored.

(h) After Health Check has completed, select "Time Stamp Data" to display the Time Stamp screen.

(i) Select the desired system from the drop-down list on the bottom of the Time Stamp screen.

(j) Check the order and time which DTCs were stored for the selected system.

CLEAR DTC (Pending and Confirmed DTC)

(a) Connect the Techstream to the DLC3.

(b) Turn the power switch on (IG).

(c) Turn the Techstream on.

(d) Enter the following menus: Powertrain / Engine / Trouble Codes.

(e) Clear the DTCs.

Powertrain > Engine > Clear DTCs

CLEAR DTC (Pending and Confirmed DTC without using Techstream)

(a) Perform either of the following operations:

NOTICE:

After turning power switch off, waiting time may be required before disconnecting the cable from the negative (-) auxiliary battery terminal. Therefore, make sure to read the disconnecting the cable from the negative (-) auxiliary battery terminal notices before proceeding with work.

Click here

(1) Disconnect the cable from the negative (-) auxiliary battery terminal for more than 1 minute.

(2) Remove the EFI-MAIN NO. 4 fuse from the No. 1 engine room relay block and No. 1 junction block assembly located inside the engine compartment for more than 1 minute.

OUTLINE
  • After clearing current DTCs using the Techstream (or by disconnecting the cable from the negative (-) auxiliary battery terminal), permanent DTCs can be cleared when the universal trip is performed and then the system is determined to be normal for the relevant DTCs. The driving pattern to obtain a normal judgment is described under the "Confirmation Driving Pattern" for the respective DTC.
  • To clear permanent DTCs, all of the following conditions must be are met:
    • There is a history that universal trip driving was performed.
    • The vehicle has been judged as normal for 2 trips. (Normal judgment does not have to be performed in 2 consecutive trip, but normal judgment should occur in the latest trip.) (not for misfire and fuel system DTCs)
    • No malfunctions are detected.

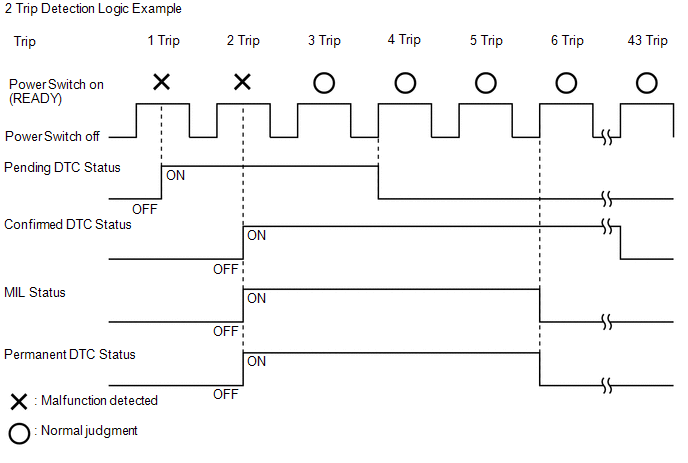
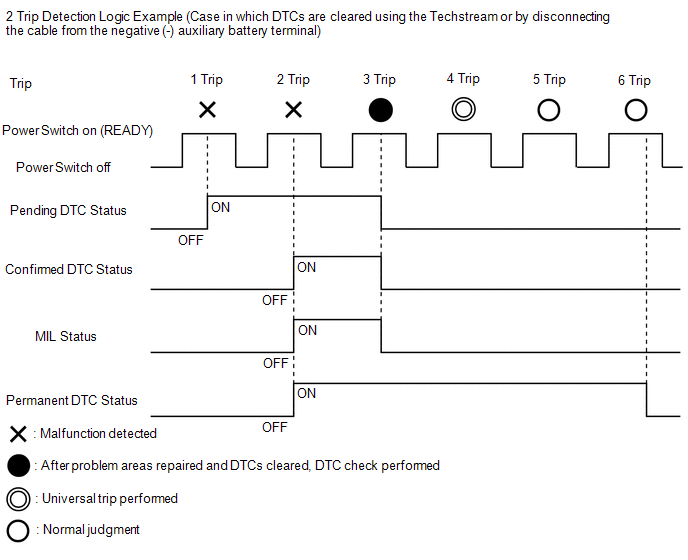
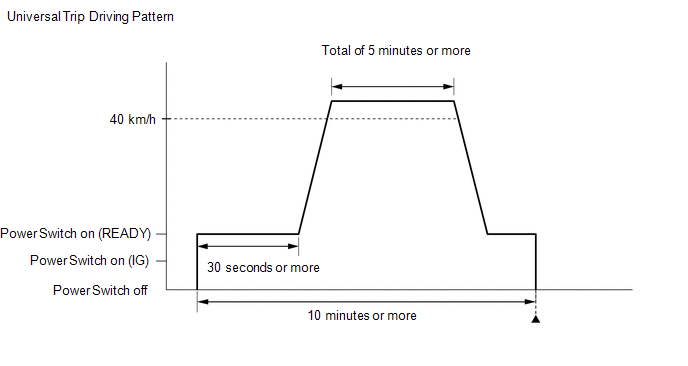
CLEAR PERMANENT DTC

(a) Connect the Techstream to the DLC3.

(b) Turn the power switch on (IG).

(c) Turn the Techstream on.

(d) Enter the following menus: Powertrain / Engine / Trouble Codes.

Powertrain > Engine > Trouble Codes

HINT:

If "PERMANENT" in the top right of the screen displays "YES", permanent DTCs are stored.

(e) Select the "Generic" tab.

(f) Check if permanent DTCs are stored.

HINT:

If permanent DTCs are not output, it is not necessary to continue this procedure.

(g) Clear the DTCs.

Powertrain > Engine > Clear DTCs

NOTICE:

Do not clear the DTCs or disconnect the cable from the auxiliary battery terminal after performing this step.

(h) Perform the universal trip.

HINT:

The driving pattern to obtain a normal judgment and the universal trip driving can be performed consecutively in the same driving cycle.

  1. Turn the power switch on (READY) and wait for 30 seconds or more.
  2. Drive the vehicle at 40 km/h (25 mph) or more for a total of 5 minutes or more.

    CAUTION:

    When performing a driving pattern, obey all speed limits and traffic laws.

    HINT:

    It is possible to complete the drive pattern even if the vehicle decelerates to less than 40 km/h (25 mph) during the driving cycle provided that the vehicle is driven at 40 km/h (25 mph) or more for a total of 5 minutes.

  3. Allow 10 minutes or more to elapse from the time the power switch turned on (READY).

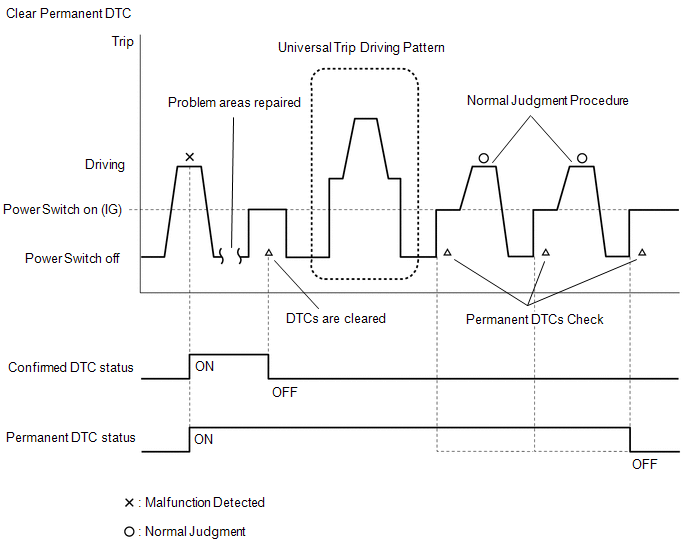
(i) Turn the power switch off and wait for 2 minutes or more.

(j) Turn the power switch on (IG).

(k) Enter the following menus: Powertrain / Engine / Trouble Codes.

Powertrain > Engine > Trouble Codes

(l) Check that the permanent DTCs have been cleared.

HINT:

If permanent DTCs are not output, it is not necessary to continue this procedure.

(m) Perform the normal judgment procedure in the respective confirmation driving pattern of each output DTC.

HINT:

  • Confirmation driving patterns do not need to be performed for misfire and fuel system DTCs.
  • Do not turn the power switch off by mistake during this step.

(n) With the power switch on (READY) wait for 5 seconds or more. (Except when the power switch is already turned on (READY) or the engine is running)

(o) Turn the power switch off and wait for 2 minutes or more.

(p) Turn the power switch on (IG).

(q) Enter the following menus: Powertrain / Engine / Trouble Codes.

Powertrain > Engine > Trouble Codes

(r) Check that the permanent DTCs have been cleared.

HINT:

If permanent DTCs are not output, it is not necessary to continue this procedure.

(s) Perform the normal judgment procedure in the respective confirmation driving pattern of each output DTC.

HINT:

  • Confirmation driving patterns do not need to be performed for misfire and fuel system DTCs.
  • Do not turn the power switch off by mistake during this step.

(t) With the power switch on (READY) wait for 5 seconds or more. (Except when the power switch is already turned on (READY) or the engine is running)

(u) Turn the power switch off and wait for 2 minutes or more.

(v) Turn the power switch on (IG).

(w) Enter the following menus: Powertrain / Engine / Trouble Codes.

Powertrain > Engine > Trouble Codes

(x) Check that the permanent DTCs have been cleared.

    Diagnostic Trouble Code Chart

    ECM Power Source Circuit

    See More:

    Toyota Avalon (XX50) 2019-2022 Service & Repair Manual > Cylinder Block: Disassembly
    DISASSEMBLY CAUTION / NOTICE / HINT The necessary procedures (adjustment, calibration, initialization or registration) that must be performed after parts are removed and installed, or replaced during engine unit removal/installation are shown below. Necessary Procedure After Parts Removed/Installed/ ...

    Toyota Avalon (XX50) 2019-2022 Owners Manual

    Toyota Avalon (XX50) 2019-2022 Service & Repair Manual

    © 2024 Copyright www.tavalon.net
    0.0172