ADJUSTMENT PROCEDURE 1. REMOVE FRONT WHEEL OPENING EXTENSION PAD RH Click here 2. REMOVE FRONT WHEEL OPENING EXTENSION PAD LH Click here 3. REMOVE NO. 1 ENGINE UNDER COVER Click here 4. REMOVE NO. 2 ENGINE UNDER COVER ASSEMBLY Click here 5. DRAIN HYBRID TRANSAXLE FLUID
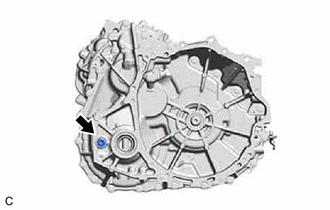
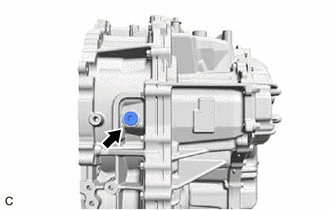
(c) Using a 10 mm hexagon socket wrench, install the drain plug and a new gasket to the hybrid vehicle transaxle assembly. Torque: 50 N·m {510 kgf·cm, 37 ft·lbf} (d) Using a 10 mm hexagon socket wrench, temporarily install the filler plug and gasket to the hybrid vehicle transaxle assembly. HINT: Reuse the old gasket as the filler plug will be removed again. 6. ADD HYBRID TRANSAXLE FLUID
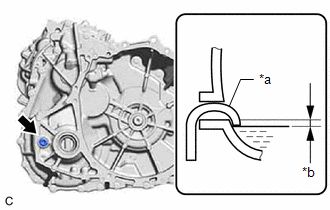
(b) Add hybrid transaxle fluid until the hybrid transaxle fluid level is between 0 to 10 mm (0 to 0.394 in.) from the bottom lip of the filler plug opening. [#] NOTICE:
Hybrid Transaxle Fluid Standard Capacity (for Reference): 3.9 liters (4.1 US qts, 3.4 Imp. qts) (c) After adding hybrid transaxle fluid, leave the vehicle for 30 seconds so that the hybrid transaxle fluid surface can become still again, and then check that the hybrid transaxle fluid level is between 0 to 10 mm (0 to 0.394 in.) from the bottom lip of the filler plug opening. (If the hybrid transaxle fluid level is low, repeat this procedure from step [#].) NOTICE: After adding hybrid transaxle fluid, make sure to check the hybrid transaxle fluid level. (d) Using a 10 mm hexagon socket wrench, temporarily install the filler plug and gasket to the hybrid vehicle transaxle assembly. HINT: Reuse the old gasket as the filler plug will be removed again. 7. INSPECT HYBRID TRANSAXLE FLUID Click here
8. INSPECT FOR HYBRID TRANSAXLE FLUID LEAK 9. INSTALL NO. 2 ENGINE UNDER COVER ASSEMBLY Click here
10. INSTALL NO. 1 ENGINE UNDER COVER Click here 11. INSTALL FRONT WHEEL OPENING EXTENSION PAD LH Click here 12. INSTALL FRONT WHEEL OPENING EXTENSION PAD RH Click here |
Toyota Avalon (XX50) 2019-2022 Service & Repair Manual > Electrical Key Oscillator(for Rear Floor): Removal
REMOVAL CAUTION / NOTICE / HINT The necessary procedures (adjustment, calibration, initialization or registration) that must be performed after parts are removed and installed, or replaced during No. 1 indoor electrical key antenna assembly removal/installation are shown below. Necessary Procedure A ...