REPLACEMENT PROCEDURE 1. REMOVE FRONT WHEEL OPENING EXTENSION PAD RH Click here 2. REMOVE FRONT WHEEL OPENING EXTENSION PAD LH Click here 3. REMOVE NO. 1 ENGINE UNDER COVER Click here 4. REMOVE NO. 2 ENGINE UNDER COVER ASSEMBLY Click here 5. REPLACE HYBRID TRANSAXLE FLUID (a) Lift the vehicle. [#1] NOTICE: Set the vehicle on a lift so that the vehicle is kept level when it is lifted up (make sure that the tilt angle from the front to rear of the vehicle is within +/- 1°).
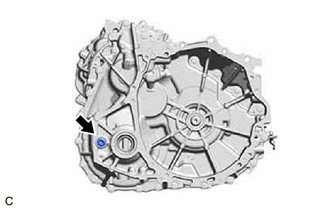
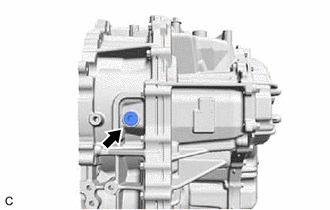
(d) Using a 10 mm hexagon socket wrench, temporarily install the drain plug and gasket to the hybrid vehicle transaxle assembly. [#4] HINT: Reuse the old gasket as the drain plug will be removed again.
(f) Using a 10 mm hexagon socket wrench, temporarily install the filler plug and gasket to the hybrid vehicle transaxle assembly. [#6] HINT: Reuse the old gasket as the filler plug will be removed again. (g) Lower the vehicle. [#7] (h) Put the engine in Inspection Mode (Maintenance Mode). [#8] Click here
(i) Idle the engine for 30 seconds with the power switch on (READY). [#9] (j) Turn the power switch off. [#10] (k) Repeat steps [#1] to [#10]. (l) Repeat steps [#1] to [#3]. (m) Using a 10 mm hexagon socket wrench, install the drain plug and a new gasket to the hybrid vehicle transaxle assembly. Torque: 50 N·m {510 kgf·cm, 37 ft·lbf} (n) Using a 10 mm hexagon socket wrench, temporarily install the filler plug and gasket to the hybrid vehicle transaxle assembly. HINT: Reuse the old gasket as the filler plug will be removed again. 6. ADD HYBRID TRANSAXLE FLUID Click here
7. INSPECT HYBRID TRANSAXLE FLUID Click here 8. INSPECT FOR HYBRID TRANSAXLE FLUID LEAK 9. INSTALL NO. 2 ENGINE UNDER COVER ASSEMBLY Click here
10. INSTALL NO. 1 ENGINE UNDER COVER Click here 11. INSTALL FRONT WHEEL OPENING EXTENSION PAD LH Click here 12. INSTALL FRONT WHEEL OPENING EXTENSION PAD RH Click here |
Toyota Avalon (XX50) 2019-2022 Service & Repair Manual > Audio And Visual System(for Gasoline Model): Sound of Portable Player cannot be Heard from Speakers or Sound is Low
PROCEDURE 1. CHECK PORTABLE PLAYER SETTINGS (a) Check the portable player settings. (1) Check that the volume is not set to "0". (2) Check that mute is off. (b) Check that the sound of the portable player can be heard from the speakers. OK: Sound of the portable player can be heard from the speakers ...