INSTALLATION PROCEDURE 1. INSTALL LOWER RADIATOR SUPPORT (a) Install the 2 lower radiator supports to the radiator assembly. 2. INSTALL RADIATOR SUPPORT CUSHION (a) Install the 2 radiator support cushions to the radiator assembly. 3. INSTALL RADIATOR ASSEMBLY (a) Engage the 2 guides. (b) Engage the 2 claws to install the fan with motor assembly to the radiator assembly. NOTICE: Do not damage the radiator assembly when installing the fan with motor assembly. (c) Install the radiator assembly with the fan with motor assembly to the vehicle body. NOTICE: Do not apply excessive force to the cooler condenser assembly or pipe when installing the radiator assembly with the fan with motor assembly. (d) Engage the 2 guides. (e) Engage the 2 claws to install the cooler condenser assembly to the radiator assembly. NOTICE: Make sure not to damage the cooler condenser assembly when installing the cooler condenser assembly.
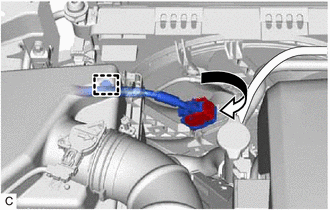
(g) Connect the cooling fan motor connector and rotate the lever to lock it. NOTICE:
(h) Engage the wire harness clamp. (i) Connect the cooling fan motor connector. (j) Engage the 4 clamps to connect the wire harness to the fan with motor assembly. 4. INSTALL NO. 3 INVERTER COOLING HOSE (a) Install the No. 3 inverter cooling hose to the radiator assembly and slide the clip to secure it. (b) Engage the clamp to connect the No. 3 inverter cooling hose to the fan with motor assembly. 5. CONNECT NO. 2 RADIATOR HOSE (a) Connect the No. 2 radiator hose to the radiator assembly and slide the clip to secure it. (b) Engage the clamp to connect the No. 2 radiator hose to the fan with motor assembly. 6. CONNECT NO. 2 INVERTER COOLING HOSE (a) Engage the clamp and connect the No. 2 inverter cooling hose to the fan with motor assembly. 7. CONNECT NO. 5 INVERTER COOLING HOSE (a) Engage the 2 clamps and connect the No. 5 inverter cooling hose to the fan with motor assembly. 8. CONNECT NO. 4 INVERTER COOLING HOSE (a) Connect the No. 4 inverter cooling hose to the radiator assembly and slide the clip to secure it. 9. CONNECT NO. 1 RADIATOR HOSE (a) Connect the No. 1 radiator hose to the radiator assembly and slide the clip to secure it. (b) Engage the clamp to connect the No. 1 radiator hose to the fan with motor assembly. 10. CONNECT NO. 6 WATER BY-PASS HOSE (a) Connect the No. 6 water by-pass hose to the radiator assembly. 11. CONNECT NO. 5 WATER BY-PASS HOSE (a) Connect the No. 5 water by-pass hose to the radiator assembly and slide the clip to secure it. 12. INSTALL UPPER RADIATOR SUPPORT SUB-ASSEMBLY (a) Install the upper radiator support sub-assembly with the 4 bolts. Torque: 12.5 N·m {127 kgf·cm, 9 ft·lbf} (b) Engage the clamp to connect the hood lock control cable assembly to the upper radiator support sub-assembly. 13. INSTALL NO. 1 RADIATOR AIR GUIDE RH (a) Engage the guide and claw. (b) Install the No. 1 radiator air guide RH with the clip. 14. INSTALL NO. 1 RADIATOR AIR GUIDE LH (a) Engage the guide and claw. (b) Install the No. 1 radiator air guide LH with the clip. 15. INSTALL UPPER RADIATOR MOUNTING BRACKET (a) Install the 2 upper radiator mounting brackets with the 2 bolts and 2 nuts. Torque: 12.5 N·m {127 kgf·cm, 9 ft·lbf} (b) Connect the 2 horn connectors. 16. INSTALL INLET AIR CLEANER ASSEMBLY Click here
17. INSTALL HOOD LOCK ASSEMBLY Click here
18. INSTALL RADIATOR SHUTTER SUB-ASSEMBLY Click here 19. INSTALL FRONT BUMPER REINFORCEMENT Click here 20. INSTALL FRONT BUMPER ENERGY ABSORBER Click here 21. INSTALL NO. 2 FRONT BUMPER ENERGY ABSORBER Click here 22. INSTALL HEADLIGHT ASSEMBLY Click here 23. INSTALL INVERTER WATER PUMP ASSEMBLY Click here 24. ADD ENGINE COOLANT (for Engine) Click here 25. INSPECT FOR COOLANT LEAK (for Engine) Click here 26. INSTALL NO. 2 ENGINE UNDER COVER ASSEMBLY Click here 27. INSTALL NO. 1 ENGINE UNDER COVER Click here 28. INSTALL FRONT WHEEL OPENING EXTENSION PAD RH Click here 29. INSTALL FRONT WHEEL OPENING EXTENSION PAD LH Click here |
Toyota Avalon (XX50) 2019-2022 Service & Repair Manual > Smart Key System(for Entry Function, Gasoline Model): Touching Unlock Sensor for Certain Period of Time does not Unlock All Doors
DESCRIPTION If the entry unlock function of the driver door cannot be operated by touching and holding the unlock sensor of the driver door, but can be operated through other methods, it can be determined that the request code is being transmitted properly from the driver door. In this case, the cer ...