Toyota Avalon (XX50) 2019-2022 Service & Repair Manual: Low Pressure Fuel System Pressure - Too High (P008B00)

Toyota Avalon (XX50) 2019-2022 Service & Repair Manual / Engine / A25a-fxs Engine Control / Sfi System / Low Pressure Fuel System Pressure - Too High (P008B00)

DESCRIPTION

Refer to DTC P008A00.

Click here

DTC No.

Detection Item

DTC Detection Condition

Trouble Area

MIL

Memory

Note

P008B00

Low Pressure Fuel System Pressure - Too High

The actual fuel pressure (for low pressure side) value is higher than target fuel pressure (for low pressure side) by a certain amount or more (1 trip detection logic).

  • Fuel pump control ECU
  • Fuel pressure sensor (for low pressure side)
  • ECM

Does not come on

DTC stored

SAE Code: P008B

MONITOR DESCRIPTION

If the fuel pressure (for low pressure side) increases despite a decrease request signal being sent to the fuel pump control ECU by the ECM, the ECM will store this DTC.

MONITOR STRATEGY

Frequency of Operation

Continuous

CONFIRMATION DRIVING PATTERN

  1. Connect the Techstream to the DLC3.
  2. Turn the power switch on (IG).
  3. Turn the Techstream on.
  4. Clear the DTCs (even if no DTCs are stored, perform the clear DTC procedure).
  5. Turn the power switch off and wait for at least 30 seconds.
  6. Turn the power switch on (IG) [A].
  7. Turn the Techstream on.
  8. Put the engine in Inspection Mode (Maintenance Mode).

    Click here

  9. Start the engine and warm it up until the engine coolant temperature reaches 75°C (167°F) or higher [B].
  10. With the engine running, drive the vehicle for 15 minutes or more [C].

    CAUTION:

    When performing the confirmation driving pattern, obey all speed limits and traffic laws.

    HINT:

    If the engine stops, further depress the accelerator pedal to restart the engine.

  11. Enter the following menus: Powertrain / Engine / Trouble Codes [D].
  12. Read the pending DTCs.

    HINT:

    • If a pending DTC is output, the system is malfunctioning.
    • If a pending DTC is not output, perform the following procedure.
  13. Enter the following menus: Powertrain / Engine / Utility / All Readiness.
  14. Input the DTC: P008B00.
  15. Check the DTC judgment result.

    Techstream Display

    Description

    NORMAL

    • DTC judgment completed
    • System normal

    ABNORMAL

    • DTC judgment completed
    • System abnormal

    INCOMPLETE

    • DTC judgment not completed
    • Perform driving pattern after confirming DTC enabling conditions

    HINT:

    • If the judgment result is NORMAL, the system is normal.
    • If the judgment result is ABNORMAL, the system has a malfunction.
    • If the judgment result is INCOMPLETE, perform steps [B] through [D] again.

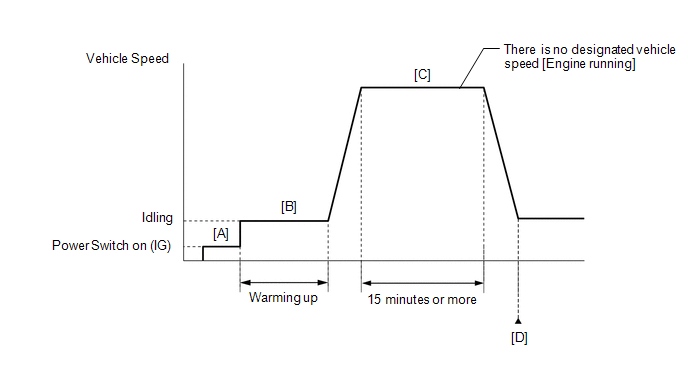
CAUTION / NOTICE / HINT

NOTICE:

  • Vehicle Control History may be stored in the hybrid vehicle control ECU assembly if the engine is malfunctioning. Certain vehicle condition information is recorded when Vehicle Control History is stored. Reading the vehicle conditions recorded in both the Freeze Frame Data and Vehicle Control History can be useful for troubleshooting.

    Click here

    (Select Powertrain in Health Check and then check the time stamp data.)

    Click here

  • If any "Engine Malfunction" Vehicle Control History item has been stored in the hybrid vehicle control ECU assembly, make sure to clear it. However, as all Vehicle Control History items are cleared simultaneously, if any Vehicle Control History items other than "Engine Malfunction" are stored, make sure to perform any troubleshooting for them before clearing Vehicle Control History.

    Click here

HINT:

Read Freeze Frame Data using the Techstream. The ECM records vehicle and driving condition information as Freeze Frame Data the moment a DTC is stored. When troubleshooting, Freeze Frame Data can help determine if the vehicle was moving or stationary, if the engine was warmed up or not, if the air fuel ratio was lean or rich, and other data from the time the malfunction occurred.

PROCEDURE

1.

CHECK OTHER DTCS OUTPUT (IN ADDITION TO DTC P008B00)

(a) Connect the Techstream to the DLC3.

(b) Turn the power switch on (IG).

(c) Turn the Techstream on.

(d) Enter the following menus: Powertrain / Engine / Trouble Codes.

(e) Read the DTCs.

Powertrain > Engine > Trouble Codes

Result

Proceed to

DTC P008B00 is output

A

DTC P008B00 and other DTCs are output

B

HINT:

If any DTCs other than P008B00 are output, troubleshoot those DTCs first.

B

GO TO DTC CHART

A

2.

READ VALUE USING TECHSTREAM (FUEL PRESSURE (LOW))

(a) Connect the Techstream to the DLC3.

(b) Turn the power switch on (IG).

(c) Turn the Techstream on.

(d) Put the engine in Inspection Mode (Maintenance Mode).

Powertrain > Hybrid Control > Utility

Tester Display

Inspection Mode

(e) Start the engine.

(f) Enter the following menus: Powertrain / Engine / Data List / Fuel Pressure (Low).

Powertrain > Engine > Data List

Tester Display

Fuel Pressure (Low)

(g) Record the Fuel Pressure (Low) value.

(h) Turn the power switch off.

(i) Discharge the fuel pressure.

HINT:

DTCs may be stored during this inspection. Check for DTCs and clear them using the Techstream.

(1) Remove the EFI-MAIN NO. 2 fuse from the No. 1 engine room relay block and No. 1 junction block assembly.

(2) Turn the power switch on (IG).

(3) Turn the Techstream on.

(4) Put the engine in Inspection Mode (Maintenance Mode).

Powertrain > Hybrid Control > Utility

Tester Display

Inspection Mode

(5) Start the engine.

(6) After the engine has stopped on its own, turn the power switch off.

HINT:

If the engine does not stop naturally, perform direct injection by racing the engine to reduce the fuel pressure [Fuel Pressure (High)] and stop the engine.

(7) Turn the power switch on (IG).

(8) Turn the Techstream on.

(9) Put the engine in Inspection Mode (Maintenance Mode).

Powertrain > Hybrid Control > Utility

Tester Display

Inspection Mode

(10) Crank the engine again and make sure that the engine does not start.

(11) Install the EFI-MAIN NO. 2 fuse.

(j) Enter the following menus: Powertrain / Engine / Data List / Fuel Pressure (Low).

Powertrain > Engine > Data List

Tester Display

Fuel Pressure (Low)

(k) Compare the Fuel Pressure (Low) value recorded with the engine running to the Fuel Pressure (Low) value currently shown on the Techstream.

Result

Proceed to

Fuel Pressure (Low) value drops

A

Fuel Pressure (Low) value is maintained

B

HINT:

Perform "Inspection After Repair" after replacing the fuel pressure sensor (for low pressure side).

Click here

B

REPLACE FUEL PRESSURE SENSOR (FOR LOW PRESSURE SIDE)

A

3.

PERFORM ACTIVE TEST USING TECHSTREAM (CONTROL THE FUEL PUMP DUTY RATIO)

(a) Install the fuel pressure gauge (for low pressure side).

Click here

(b) Connect the Techstream to the DLC3.

(c) Turn the power switch on (IG).

(d) Turn the Techstream on.

(e) Enter the following menus: Powertrain / Engine / Active Test / Control the Fuel Pump Duty Ratio / Data List / Fuel Pressure (Low).

Powertrain > Engine > Active Test

Active Test Display

Control the Fuel Pump Duty Ratio

Data List Display

Fuel Pressure (Low)

(f) Compare the values in the Data List using the Techstream and the fuel pressure gauge when the Active Test was performed.

Standard:

Techstream Operation

Standard

Low

Data List value and fuel pressure gauge are within +/-50 kPa of each other

High

HINT:

Perform "Inspection After Repair" after replacing the fuel pressure sensor (for low pressure side).

Click here

NG

REPLACE FUEL PRESSURE SENSOR (FOR LOW PRESSURE SIDE)

OK

4.

PERFORM ACTIVE TEST USING TECHSTREAM (CONTROL THE FUEL PUMP DUTY RATIO)

(a) Install the fuel pressure gauge (for low pressure side).

Click here

(b) Connect the Techstream to the DLC3.

(c) Turn the power switch on (IG).

(d) Turn the Techstream on.

(e) Enter the following menus: Powertrain / Engine / Active Test / Control the Fuel Pump Duty Ratio / Data List / Fuel Pressure (Low).

Powertrain > Engine > Active Test

Active Test Display

Control the Fuel Pump Duty Ratio

Data List Display

Fuel Pressure (Low)

(f) Read the values on the Data List and the fuel pressure gauge when the Active Test was performed.

Techstream Operation

Fuel Pressure (Low)

Fuel pressure gauge

Proceed to

Low

Below 600 kPa

Below 600 kPa (6.1 kgf/cm2, 87 psi)

A

600 kPa or higher

600 kPa (6.1 kgf/cm2, 87 psi) or higher

B

B

REPLACE FUEL PUMP CONTROL ECU

A

5.

CLEAR DTC

(a) Connect the Techstream to the DLC3.

(b) Turn the power switch on (IG).

(c) Turn the Techstream on.

(d) Clear the DTCs.

Powertrain > Engine > Clear DTCs

(e) Turn the power switch off and wait for at least 30 seconds.

NEXT

6.

CHECK WHETHER DTC OUTPUT RECURS (DTC P008B00)

(a) Drive the vehicle in accordance with the driving pattern described in Confirmation Driving Pattern.

(b) Enter the following menus: Powertrain / Engine / Utility / All Readiness.

Powertrain > Engine > Utility

Tester Display

All Readiness

(c) Input the DTC: P008B00.

(d) Check the DTC judgment result.

Result

Proceed to

NORMAL

(DTCs are not output)

A

ABNORMAL

(DTC P008B00 is output)

B

A

CHECK FOR INTERMITTENT PROBLEMS

B

REPLACE ECM

    Low Pressure Fuel System Pressure - Too Low (P008A00)

    Bank 1 Air-Fuel Ratio Imbalance (Port) (P11EA00,P11EC00-P11EF00,P219A00,P219C00-P219F00)

    See More:

    Toyota Avalon (XX50) 2019-2022 Service & Repair Manual > Service Plug Grip: Installation
    INSTALLATION PROCEDURE 1. INSTALL SERVICE PLUG GRIP CAUTION: Be sure to wear insulated gloves. NOTICE: Before installing the service plug grip, check that no parts or tools remain and that the high voltage terminals and connectors are connected securely. (a) While wearing insulated gloves, and tempo ...

    Toyota Avalon (XX50) 2019-2022 Owners Manual

    Toyota Avalon (XX50) 2019-2022 Service & Repair Manual

    © 2024 Copyright www.tavalon.net
    0.0152