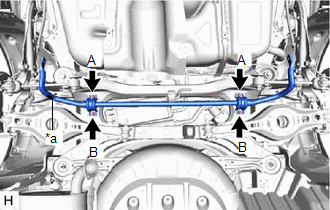
INSTALLATION PROCEDURE 1. INSTALL REAR STABILIZER BUSHING (a) Install the 2 rear stabilizer bushings to the rear stabilizer bar. NOTICE: Be sure to install the rear stabilizer bushings so that each cutout faces the front of the vehicle. 2. INSTALL REAR NO. 1 STABILIZER BAR BRACKET LH (a) Install the rear No. 1 stabilizer bar bracket LH to the rear stabilizer bushing. NOTICE: Be sure to install the rear No. 1 stabilizer bar bracket LH so that each arrow mark faces the front of the vehicle. 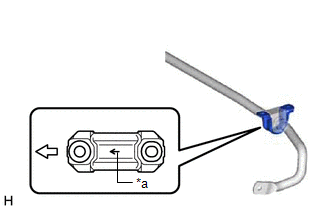
3. INSTALL REAR NO. 1 STABILIZER BAR BRACKET RH HINT: Perform the same procedure as for the LH side. 4. INSTALL REAR STABILIZER BAR
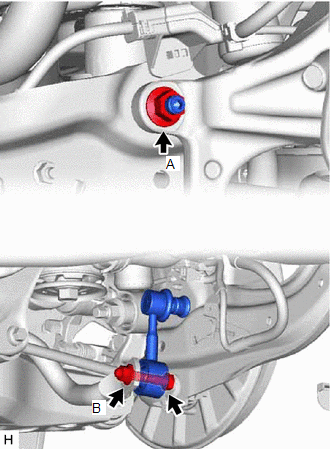
5. STABILIZE SUSPENSION Click here 6. INSTALL REAR STABILIZER LINK ASSEMBLY LH
(b) Install the rear stabilizer link assembly LH with the bolt and nut (B). Torque: 75 N┬Ęm {765 kgf┬Ęcm, 55 ft┬Ęlbf} NOTICE: Because the bolt has its own stopper, do not turn the bolt. Tighten the nut with the bolt secured. 7. INSTALL REAR STABILIZER LINK ASSEMBLY RH HINT: Perform the same procedure as for the LH side. 8. INSTALL CENTER EXHAUST PIPE ASSEMBLY for 2GR-FKS: Click here
for A25A-FXS: Click here
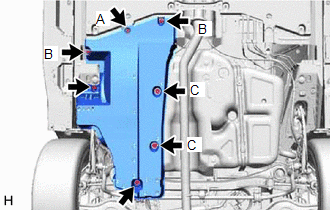
9. INSTALL NO. 1 FLOOR UNDER COVER (for Gasoline Model)
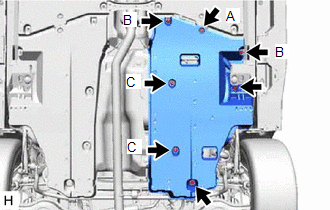
(b) Install the 2 bolts and clip (A). Torque: Bolt : 7.5 N┬Ęm {76 kgf┬Ęcm, 66 in┬Ęlbf} 10. INSTALL NO. 2 FLOOR UNDER COVER (for Gasoline Model)
(b) Install the 2 bolts and clip (A). Torque: Bolt : 7.5 N┬Ęm {76 kgf┬Ęcm, 66 in┬Ęlbf} 11. INSTALL REAR WHEEL Click here 12. INSPECT FOR EXHAUST GAS LEAK for 2GR-FKS: Click here
for A25A-FXS: Click here
|
Toyota Avalon (XX50) 2019-2022 Service & Repair Manual > Tilt And Telescopic Manual Switch: Inspection
INSPECTION PROCEDURE 1. INSPECT TILT AND TELESCOPIC SWITCH (a) Remove the tilt and telescopic switch. Click here (b) Measure the resistance according to the value(s) in the table below. Standard Resistance: Tester Connection Condition Specified Condition G30-1 (VC) - G30-3 (MSW) Tilt up 342 to 378 ╬ ...