INSTALLATION PROCEDURE 1. INSTALL DCM (TELEMATICS TRANSCEIVER) 2. INSTALL NO. 3 TELEPHONE BRACKET (a) Engage the 3 claws to install the No. 3 telephone bracket as shown in the illustration. 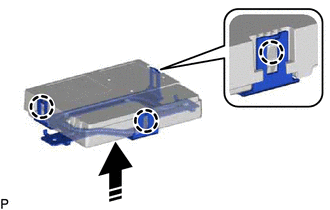
3. INSTALL DCM (TELEMATICS TRANSCEIVER) ASSEMBLY 4. INSTALL NAVIGATION ECU WITH ANTENNA CORD (w/ Navigation System) 5. INSTALL NO. 1 TELEPHONE BRACKET (a) w/o Navigation System: (1) Engage the 2 guides and install the No. 1 telephone bracket with the screw. (b) w/ Navigation System: (1) Engage the 3 guides and install the No. 1 telephone bracket with the 3 screws. 6. INSTALL NO. 2 TELEPHONE BRACKET (a) w/o Navigation System: (1) Engage the 2 guides and install the No. 2 telephone bracket with the screw. (2) Engage the wiring harness clamp. (b) w/ Navigation System: (1) Engage the 3 guides and install the No. 2 telephone bracket with the 3 screws. (2) Engage the wiring harness clamp. (3) Engage the clamp. 7. INSTALL TELEPHONE AND GPS ANTENNA CORD Click here 8. INSTALL DCM (TELEMATICS TRANSCEIVER) WITH BRACKET (a) w/o Navigation System: (1) Connect each connector. (2) Install the DCM (telematics transceiver) with bracket with the 2 nuts as shown in the illustration. 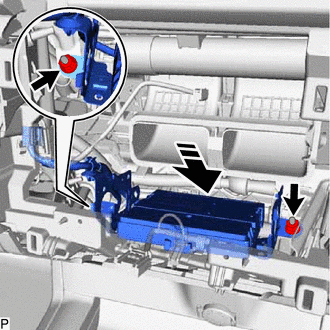
(3) Connect the connector. (b) w/ Navigation System: (1) Connect each connector. (2) Install the DCM (telematics transceiver) with bracket with the 2 nuts as shown in the illustration. 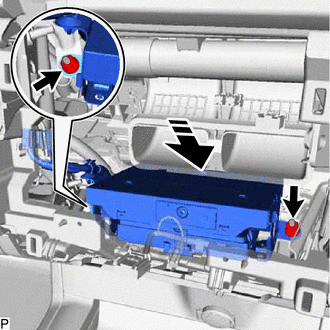
(3) Connect the 2 connectors. 9. INSTALL NO. 2 HEATER TO REGISTER DUCT SUB-ASSEMBLY Click here
10. INSTALL RADIO AND DISPLAY RECEIVER ASSEMBLY WITH BRACKET Click here 11. INSTALL CENTER NO. 2 INSTRUMENT CLUSTER FINISH PANEL Click here 12. INSTALL CENTER NO. 1 INSTRUMENT CLUSTER FINISH PANEL Click here 13. INSTALL CENTER INSTRUMENT CLUSTER FINISH PANEL SUB-ASSEMBLY Click here 14. INSTALL CONSOLE BOX POCKET SUB-ASSEMBLY Click here 15. INSTALL FRONT CONSOLE UPPER PANEL GARNISH Click here 16. INSTALL LOWER INSTRUMENT PANEL FINISH PANEL RH Click here 17. INSTALL LOWER INSTRUMENT PANEL FINISH PANEL LH Click here 18. PERFORM DCM ACTIVATION HINT: After replacing the DCM (telematics transceiver), make sure to perform DCM activation. for Gasoline Model: Click here for HV Model: Click here
19. PERFORM REGISTRATION for Toyota Entune Remote Connect Compatible Type: HINT: After replacing the DCM (telematics transceiver), make sure to perform code registration (Smart key System (for Start Function)). for Gasoline Model: Click here
for HV Model: Click here
|
Toyota Avalon (XX50) 2019-2022 Service & Repair Manual > Rear Brake Flexible Hose: Installation
INSTALLATION CAUTION / NOTICE / HINT NOTICE: Because the left and right rear flexible hoses are not interchangeable, verify the part number when installing the rear flexible hoses. When reusing the rear flexible hoses, use the identification marks created during removal to install each rear flexible ...


