Toyota Avalon Service & Repair Manual: Vanity Light

Components

COMPONENTS

ILLUSTRATION

*1

FRONT LENS HOLDER LH

*2

FRONT LENS HOLDER RH

*3

VANITY LIGHT BULB

*4

VISOR ASSEMBLY

*5

VISOR BRACKET COVER

-

-

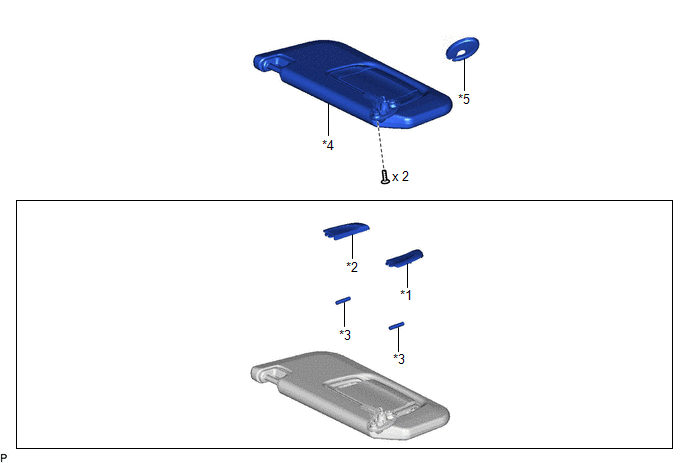
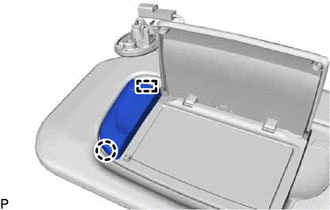
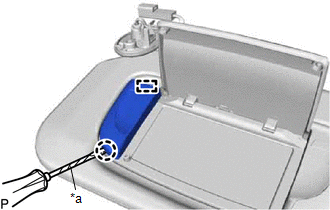
Inspection

INSPECTION

PROCEDURE

1. INSPECT VISOR ASSEMBLY LH

(a) Apply auxiliary battery voltage to the visor assembly LH and check that the lights illuminate.

OK:

Measurement Condition

Condition

Specified Condition

Auxiliary battery positive (+) → 2 (+B)

Auxiliary battery negative (-) → 1 (E)

Mirror cover open

Vanity lights illuminate

If the result is not as specified, replace the bulb or visor assembly LH.

*a

Component without harness connected

(Visor Assembly LH)

2. INSPECT VISOR ASSEMBLY RH

(a) Apply auxiliary battery voltage to the visor assembly RH and check that the lights illuminate.

OK:

Measurement Condition

Condition

Specified Condition

Auxiliary battery positive (+) → 2 (+B)

Auxiliary battery negative (-) → 1 (E)

Mirror cover open

Vanity lights illuminate

If the result is not as specified, replace the bulb or visor assembly RH.

*a

Component without harness connected

(Visor Assembly RH)

Installation

INSTALLATION

CAUTION / NOTICE / HINT

HINT:

  • Use the same procedure for the RH side and LH side.
  • The following procedure is for the LH side.

PROCEDURE

1. INSTALL VANITY LIGHT BULB

(a) Install the 2 vanity light bulbs to the visor assembly.

2. INSTALL FRONT LENS HOLDER LH

(a) Engage the guide and claw to install the front lens holder LH.

3. INSTALL FRONT LENS HOLDER RH

HINT:

Use the same procedure as for the front lens holder LH.

4. INSTALL VISOR ASSEMBLY

Click here

5. INSTALL VISOR BRACKET COVER

Click here

Removal

REMOVAL

CAUTION / NOTICE / HINT

HINT:

  • Use the same procedure for the RH side and LH side.
  • The following procedure is for the LH side.

PROCEDURE

1. REMOVE VISOR BRACKET COVER

Click here

2. REMOVE VISOR ASSEMBLY

Click here

3. REMOVE FRONT LENS HOLDER LH

(a) Using a screwdriver with its tip wrapped with protective tape, disengage the claw and guide to remove the front lens holder LH.

*a

Protective Tape

4. REMOVE FRONT LENS HOLDER RH

HINT:

Use the same procedure as for the front lens holder LH.

5. REMOVE VANITY LIGHT BULB

(a) Remove the 2 vanity light bulbs from the visor assembly.
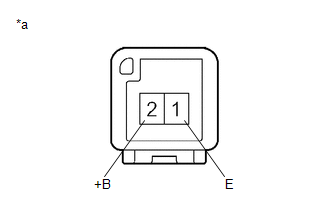
    Vanity Light Bulb

    Meter / Gauge / Display

    See More:

    Toyota Avalon Service & Repair Manual > Lighting System(for Gasoline Model With Cornering Light): Variation Code not Written (B2451)
    DESCRIPTION The headlight ECU sub-assembly LH stores this DTC if the vehicle specifications have not been stored. DTC No. Detection Item DTC Detection Condition Trouble Area DTC Output from B2451 Variation Code not Written The engine switch is on (IG). Vehicle specifications have not been stored - H ...

    Toyota Avalon Owners Manual

    Toyota Avalon Service & Repair Manual

    © 2023 Copyright www.tavalon.net
    0.0145