REGISTRATION PROCEDURE 1. REGISTER TRANSMITTER CODE
HINT:
- The vehicle garage door opener records transmitter codes for systems
such as garage doors, gates, entry gates, door locks, home lighting
systems, security systems or other transmitter code based systems.
- The garage door opener is built into the inner rear view mirror
assembly. If replacing the inner rear view mirror assembly, transmitter
codes for any systems previously registered in the garage door opener
must be re-registered.
(a) Re-registration of codes in the garage door opener system (registration mode).
CAUTION: Do
not perform transmitter code registration for a system if people or
objects are near the system. When registering transmitter codes for a
system, injury or damage can occur because the system may open, close,
unlock or otherwise operate.
NOTICE:
- Before transmitter code registration, confirm that all the electrical
systems (headlight, blower motor, rear defogger, etc.) are turned off
and no key is in the vehicle.
- The garage door opener cannot be used with systems that:
(1) Were manufactured before April 1, 1982.
(2) Do not meet federal safety standards (for example, garage doors without a jam protection function).
HINT:
- A maximum of 3 transmitter codes can be registered with the garage door
opener system. It is possible to register 1 handheld transmitter code
(original transmitter) for each of the 3 garage door opener system
switches.
- Disconnecting the vehicle battery will not clear the transmitter codes registered in the garage door opener system.
- An attempt to overwrite a previously registered code may fail. In this
case, the previously registered transmitter code will not be cleared.
- To successfully program the garage door opener system, it may be
necessary to replace the handheld transmitter battery before
programming.
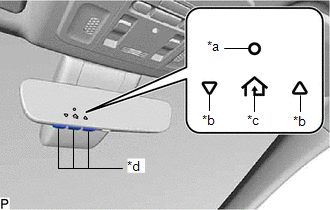
| (1) Step 1: Select
a garage door opener ("HomeLink") switch for transmitter code
registration and check that the ("HomeLink") indicator light flashes. HINT:
Perform
step 3 within 60 seconds of step 1, or the indicator light will stop
flashing and programming will not be able to be completed. |
 |
|
*a | ("HomeLink") Indicator Light | |
*b | Garage Door Operation Indicators | |
*c | ("HomeLink") Icon | |
*d | Garage Door Opener ("HomeLink") Switches | | |
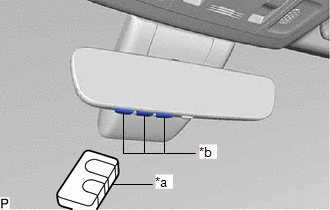
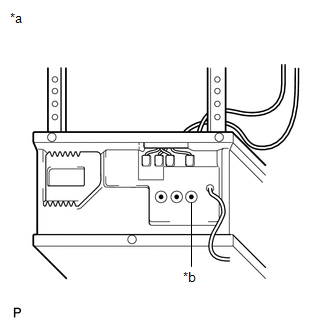
| (2) Step 2: Point
the remote control transmitter for the device at the rear view mirror
assembly, 25 to 75 mm (1.0 to 3.0 in.) from the garage door opener
("HomeLink") switches. HINT: Keep the ("HomeLink") indicator light in view while programming. |
 |
|
*a | Handheld Transmitter | |
*b | Garage Door Opener ("HomeLink") Switches | | |
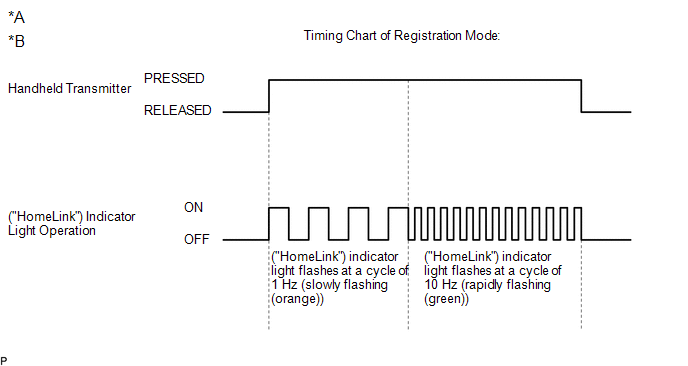
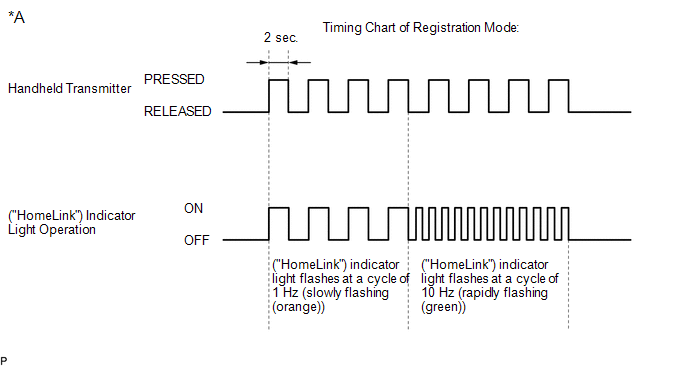
(3) Step 3: for USA: except Entry Gate Press
and hold the handheld transmitter button until the ("HomeLink")
indicator light changes from slowly flashing (orange) to rapidly
flashing (green) (rolling code) or continuously lit (green) (fixed
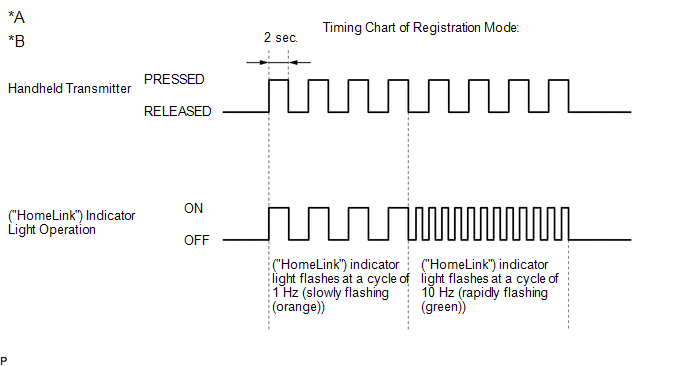
code), then release the handheld transmitter button. for Entry Gate
Repeatedly
press and release the handheld transmitter button at 2 second intervals
until the ("HomeLink") indicator light changes from slowly flashing
(orange) to rapidly flashing (green) (rolling code) or continuously lit
(green) (fixed code). for Canada: Repeatedly
press and release the handheld transmitter button at 2 second intervals
until the ("HomeLink") indicator light changes from slowly flashing
(orange) to rapidly flashing (green) (rolling code) or continuously lit
(green) (fixed code). (4) Step 4: Test the ("HomeLink") operation by pressing the newly programmed switch and observing the indicator light.
HINT:
- Device with fixed code: if the indicator light is solid and continuous,
programming has been completed and the device should activate when the
garage door opener ("HomeLink") switch is pressed and released.
- Device with rolling code: if the indicator light flashes rapidly, the
garage door opener motor (or other device) is equipped with a rolling
code. Complete the programming process by firmly pressing and holding
the programmed garage door opener ("HomeLink") switch for 2 seconds and
then release the handheld transmitter button.
- If the garage door or other device does not operate, proceed to "Programming a rolling code system".
(5) If the transmitter code
registration was successful, the ("HomeLink") indicator light of the
garage door opener flashes (green) at a cycle of 10 Hz (rapidly). If no
malfunction occurs, release both the garage door opener ("HomeLink")
switch and handheld transmitter button.
|
*A | for USA |
*B | except Entry Gate |
|
*A | for USA |
*B | for Entry Gate |
HINT:
- If transmitter code registration fails:
(1) The battery in the handheld transmitter may be weak or needs to be replaced.
(2) The handheld transmitter and opener device to be registered may not be compatible with the garage door opener.
- Some transmitter signals stop after 1 to 2 seconds. For these types of transmitters:
(1) Press and hold one of the garage door opener ("HomeLink") switches.
(2)
Press and release the handheld transmitter button every 2 seconds.
Check if the transmitter code was successfully registered.
- After entering the garage door opener registration mode, transmitter
code registration must be completed within 90 seconds. If 55 seconds
elapse, the garage door opener will enter low power mode (refer to "Low
Power Mode" below).
(6) Repeat the steps above to program another device for any of the remaining garage door opener ("HomeLink") switches.
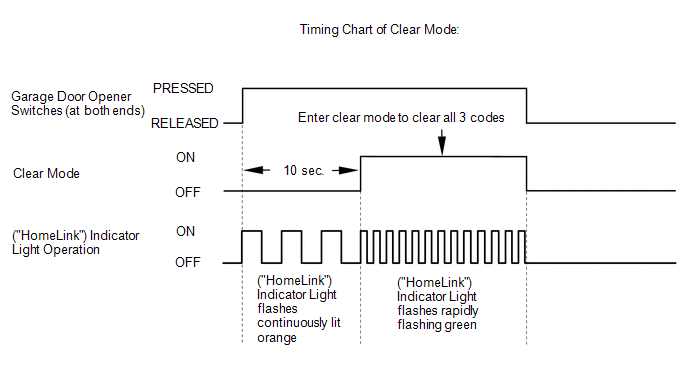
(b) Clearing transmitter codes in the garage door opener system (clear mode).

|
*a | ("HomeLink") Indicator Light | |
*b | Garage Door Opener ("HomeLink") Switch 1 | |
*c | Garage Door Opener ("HomeLink") Switch 3 |
HINT: All 3 registered transmitter codes will be cleared. No option exists for only erasing one transmitter code.
(1)
Press and hold the garage door opener ("HomeLink") switches 1 and 3 for
10 seconds until the ("HomeLink") indicator light changes from
continuously lit orange to rapidly flashing green.
 (c) Low power mode: (1)
If a garage door opener ("HomeLink") switch is held for 55 seconds or
more, the garage door opener will enter low power mode to reduce power
consumption. When the garage door opener has entered low power mode, the
("HomeLink") indicator light turns off. 2. ROLLING CODE SYSTEMS
| (a)
If the handheld transmitter for the opener device (customer's garage
door) being programmed uses a rolling code, it may be necessary to
"train" the garage door opener device.
HINT:
- "Train" refers to causing the opener device (customer's ceiling mounted garage door opener) to recognize a non-rolling code.
- The steps required to "train" an opener device may vary depending on the model, type, age, and manufacturer of the device.
(1) Locate the training button on the opener device. (2) Press the training button.
(3)
Within 30 seconds, press and release the programmed garage door opener
("HomeLink") switch twice. Some opener devices may require the garage
door opener ("HomeLink") switch to be pressed 3 times. HINT: The
vehicle garage door opener system should now operate the opener device.
Opener device refers to a device such as a ceiling mounted garage door
opener, which is located at the customer's residence. It is necessary to
read the instructions for the customer's opener device, to allow the
above procedure to be performed safely and successfully. The customer
should be aware that performing this procedure will result in a lowered
level of security for the customer's opener device. |
 |
|
*a | Example | |
*b | Training Button | | | |


