ADJUSTMENT PROCEDURE 1. INSPECT AND ADJUST BRAKE PEDAL HEIGHT (a) Remove the front door scuff plate LH. Click here
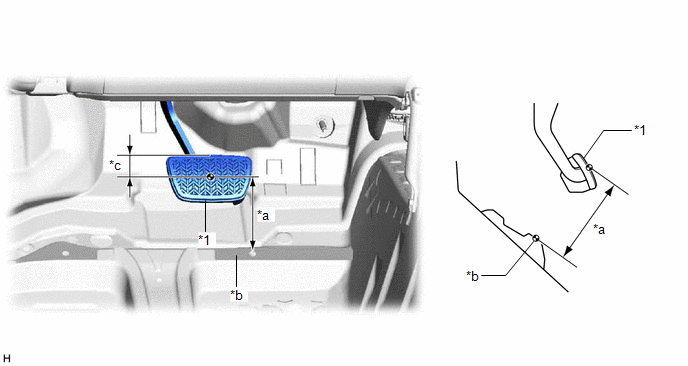
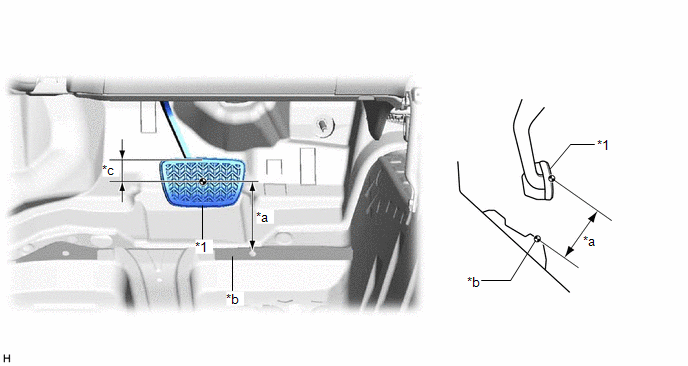
(b) Remove the cowl side trim sub-assembly LH. Click here (c) Remove the No. 1 instrument panel under cover sub-assembly. Click here (d) Remove the accelerator pedal pad. Click here (e) Remove the accelerator pedal. Click here (f) Check the brake pedal height. HINT: Inspect and adjust the brake pedal height with the floor carpet and front floor mat folded back. (1) Measure the shortest distance between the brake pedal pad surface and floor panel as shown in the illustration. 
Brake Pedal Height from Floor Panel: 147.5 to 161.5 mm (5.81 to 6.36 in.) HINT: If the brake pedal height is not as specified, inspect and adjust the push rod length according to the procedure below. (g) Adjust the push rod length.
(2) Loosen the lock nut. (3) Adjust the brake pedal height by turning the push rod. Brake Pedal Height from Floor Panel: 147.5 to 161.5 mm (5.81 to 6.36 in.) (4) Tighten the lock nut. Torque: 25.5 N·m {260 kgf·cm, 19 ft·lbf} (5) Install the stop light switch assembly. Click here
(h) Install the accelerator pedal. Click here (i) Install the accelerator pedal pad. Click here (j) Install the No. 1 instrument panel under cover sub-assembly. Click here (k) Install the cowl side trim sub-assembly LH. Click here (l) Install the front door scuff plate LH. Click here 2. INSPECT AND ADJUST BRAKE PEDAL STROKE SENSOR ASSEMBLY (a) Inspect the brake pedal stroke sensor assembly. (1) Connect the Techstream to the DLC3 with the power switch off. (2) Turn the power switch on (IG). (3) Turn the Techstream on and enter the following menus: Chassis / ABS/VSC/TRAC / Data List / Stroke Sensor. Chassis > ABS/VSC/TRAC > Data List
(4) Read the stroke sensor value without the brake pedal depressed. Standard Voltage (without the brake pedal depressed): 0.8 to 1.2 V HINT: If the stroke sensor value is not within the standard voltage, adjust the brake pedal stroke sensor assembly. (b) Adjust the brake pedal stroke sensor assembly. (1) Remove the No. 1 instrument panel under cover sub-assembly. Click here
(4) Tighten the 2 nuts. Torque: 8.5 N·m {87 kgf·cm, 75 in·lbf} (5) Turn the Techstream off and turn the power switch off. (6) Disconnect the Techstream. (7) Install the No. 1 instrument panel under cover sub-assembly. Click here
(c) Perform linear solenoid valve offset learning, ABS holding solenoid valve learning, brake pedal stroke sensor assembly zero point calibration and system information memorization. Click here
3. INSPECT BRAKE PEDAL FREE PLAY
4. INSPECT BRAKE PEDAL RESERVE DISTANCE HINT: Measure the distance at the same point used for the brake pedal height inspection. (a) With the power switch on (READY), depress the brake pedal and measure the brake pedal reserve distance. 
Brake Pedal Reserve Distance from Floor Panel at 300 N (31 kgf, 67.4 lbf): 85 mm (3.35 in.) or more HINT: If the distance is not as specified, troubleshoot the brake system. Click here |
Toyota Avalon (XX50) 2019-2022 Service & Repair Manual > Lighting System(for Gasoline Model Without Cornering Light): Daytime Running Light Circuit
DESCRIPTION The main body ECU (multiplex network body ECU) controls the daytime running lights. WIRING DIAGRAM CAUTION / NOTICE / HINT NOTICE: Inspect the fuses for circuits related to this system before performing the following procedure. Before replacing the main body ECU (multiplex network body E ...