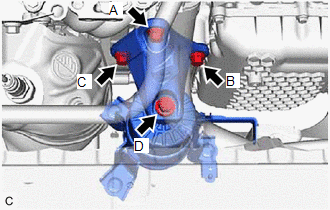
INSTALLATION PROCEDURE 1. INSTALL FRONT ENGINE MOUNTING INSULATOR (a) Install the stay to the front engine mounting insulator with the nut. Torque: 6.0 N·m {61 kgf·cm, 53 in·lbf} (b) Install the front engine mounting insulator to the front frame assembly with the 3 nuts. Torque: 72 N·m {734 kgf·cm, 53 ft·lbf}
(d) Install the front engine mounting bracket to the front engine mounting insulator with the bolt. Torque: Bolt (D) : 72 N·m {734 kgf·cm, 53 ft·lbf} (e) Connect the vacuum hose to the front engine mounting insulator. (f) Engage the 2 clamps to install the vacuum hoses to the front engine mounting insulator. 2. INSTALL REAR ENGINE UNDER COVER LH Click here
3. INSTALL NO. 1 ENGINE UNDER COVER Click here 4. INSTALL FRONT WHEEL OPENING EXTENSION PAD LH Click here 5. INSTALL FRONT WHEEL OPENING EXTENSION PAD RH Click here 6. INSTALL V-BANK COVER SUB-ASSEMBLY Click here 7. INSTALL VACUUM SWITCHING VALVE (for Active Control Engine Mount System) Click here |
Toyota Avalon (XX50) 2019-2022 Service & Repair Manual > Coolant(for Inverter): On-vehicle Inspection
ON-VEHICLE INSPECTION CAUTION / NOTICE / HINT CAUTION: To avoid the danger of being burned, do not remove the reserve tank cap while the coolant (for inverter) is still hot. Pressurized, hot coolant (for inverter) and steam may be released and cause serious burns. PROCEDURE 1. INSPECT FOR COOLANT LE ...