Components COMPONENTS ILLUSTRATION 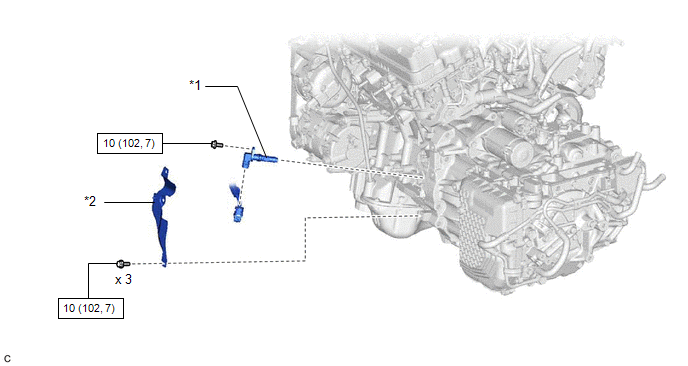
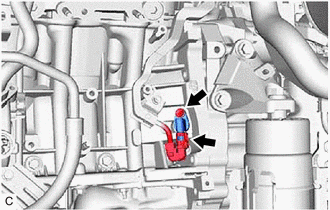
Installation INSTALLATION PROCEDURE 1. INSTALL CRANKSHAFT POSITION SENSOR (a) Apply a light coat of engine oil to the O-ring of the crankshaft position sensor. NOTICE: If reusing the crankshaft position sensor, be sure to inspect the O-ring. (b) Install the crankshaft position sensor to the cylinder block sub-assembly with the bolt. Torque: 10 N·m {102 kgf·cm, 7 ft·lbf} NOTICE:
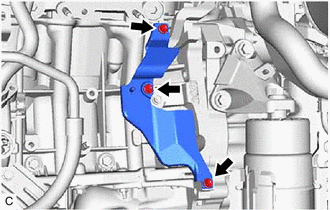
(c) Connect the crankshaft position sensor connector. 2. INSTALL CRANKSHAFT POSITION SENSOR PROTECTOR (a) Install the crankshaft position sensor protector to the cylinder block sub-assembly and oil pan sub-assembly with the 3 bolts. Torque: 10 N·m {102 kgf·cm, 7 ft·lbf} 3. INSTALL EXHAUST MANIFOLD SUB-ASSEMBLY LH (TWC: Front Catalyst) Click here
Removal REMOVAL CAUTION / NOTICE / HINT The necessary procedures (adjustment, calibration, initialization or registration) that must be performed after parts are removed and installed, or replaced during crankshaft position sensor removal/installation are shown below. Necessary Procedures After Parts Removed/Installed/Replaced
PROCEDURE 1. REMOVE EXHAUST MANIFOLD SUB-ASSEMBLY LH (TWC: Front Catalyst) Click here
2. REMOVE CRANKSHAFT POSITION SENSOR PROTECTOR
3. REMOVE CRANKSHAFT POSITION SENSOR
(b) Remove the bolt and crankshaft position sensor from the cylinder block sub-assembly. NOTICE: If the crankshaft position sensor has been struck or dropped, replace it. |
Toyota Avalon (XX50) 2019-2022 Service & Repair Manual > Tire Pressure Warning System(for Hv Model): Terminals Of Ecu
TERMINALS OF ECU CHECK TIRE PRESSURE WARNING ECU AND RECEIVER (a) Disconnect the K11 tire pressure warning ECU and receiver connector and measure the voltage or resistance on the wire harness side. *a Front view of wire harness connector (to Tire Pressure Warning ECU and Receiver) Terminal No. (Symb ...