INSTALLATION PROCEDURE 1. INSTALL HYBRID BATTERY THERMISTOR CAUTION: Be sure to wear insulated gloves and protective goggles.
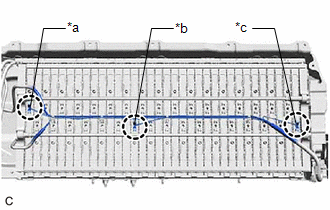
(c) Connect the battery voltage sensor connector. (d) Engage the clamp.
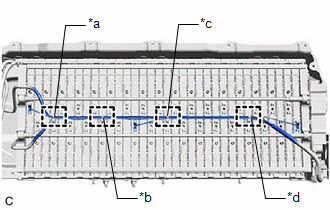
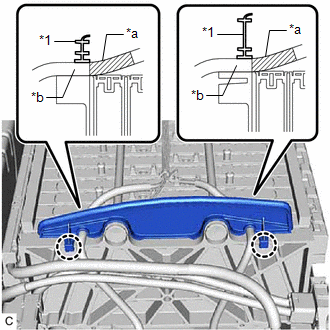
(f) Engage the clamp. 2. INSTALL NO. 1 HV BATTERY INTAKE DUCT LH CAUTION: Be sure to wear insulated gloves and protective goggles. (a) Install the No. 1 HV battery intake duct LH to the HV battery with the clip. (b) Engage the claw of hybrid battery thermistor (sensor portion) to connect the hybrid battery thermistor to the No. 1 HV battery intake duct LH. 3. INSTALL NO. 2 HYBRID BATTERY SHIELD SUB-ASSEMBLY CAUTION: Be sure to wear insulated gloves and protective goggles. (a) Pull back the rear No. 1 HV battery shield and install the No. 2 hybrid battery shield sub-assembly to the HV battery. HINT: Pull back the rear No. 1 HV battery shield until there is sufficient clearance for the stud bolt of the No. 2 hybrid battery shield sub-assembly. (b) Install the 5 nuts. Torque: 7.5 N·m {76 kgf·cm, 66 in·lbf} 4. INSTALL HV BATTERY JUNCTION BLOCK ASSEMBLY Click here
5. INSTALL UPPER HV BATTERY COVER SUB-ASSEMBLY Click here 6. INSTALL HV BATTERY Click here |
Toyota Avalon (XX50) 2019-2022 Service & Repair Manual > Automatic Transaxle System: Pressure Control Solenoid "L" Circuit Short to Ground or Open (P08BA14)
DESCRIPTION Refer to DTC P08BA12. Click here DTC No. Detection Item DTC Detection Condition Trouble Area MIL Memory Note P08BA14 Pressure Control Solenoid "L" Circuit Short to Ground or Open While the vehicle is being driven so that gear changes occur, a short to ground or open is detected in the so ...