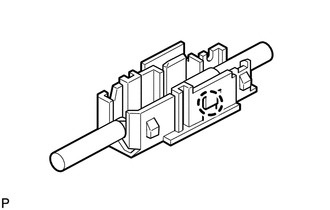
INSTALLATION PROCEDURE 1. INSTALL RADIO SETTING CONDENSER (for Window Defogger)
(b) Engage the 3 claws to install the new terminal cover with wire harness to a new condenser as shown in the illustration. 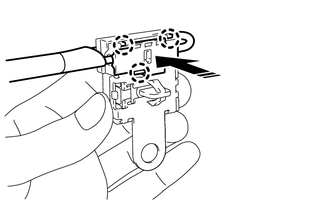
NOTICE:
(c) Engage the clamp to temporarily install a new radio setting condenser with wire harness. (d) Install the new radio setting condenser with the bolt. Torque: 10 N·m {102 kgf·cm, 7 ft·lbf} 2. INSTALL ROOF SIDE INNER GARNISH LH Click here 3. INSTALL ROOF SIDE RAIL GARNISH ASSEMBLY LH Click here 4. INSTALL REAR DOOR OPENING TRIM WEATHERSTRIP LH Click here 5. INSTALL RADIO SETTING CONDENSER (for High Mounted Stop Light)
(b) Engage the 6 claws to install 2 new terminal covers with wire harness to a new condenser as shown in the illustration. 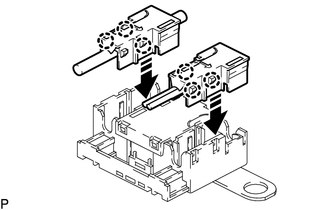
NOTICE:
(c) Insert the cover as shown in the illustration and engage the claw. 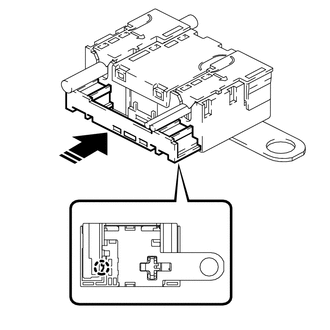
(d) Engage the clamp to temporarily install the new radio setting condenser with wire harness. (e) Install the new radio setting condenser with the bolt. Torque: 10 N·m {102 kgf·cm, 7 ft·lbf} 6. INSTALL REAR SIDE SEATBACK ASSEMBLY LH Click here 7. INSTALL REAR SEAT CUSHION LOCK HOOK Click here 8. INSTALL REAR SEAT CUSHION ASSEMBLY Click here 9. CONNECT REAR CENTER SEAT OUTER BELT ASSEMBLY Click here 10. INSTALL LUGGAGE COMPARTMENT INNER TRIM PAD (w/ Seat Heater System) Click here 11. INSTALL SPARE WHEEL COVER ASSEMBLY (w/ Seat Heater System) Click here 12. CONNECT CABLE TO NEGATIVE AUXILIARY BATTERY TERMINAL for A25A-FXS: Click here for 2GR-FKS: Click here 13. INSTALL LUGGAGE TRIM SERVICE HOLE COVER (for HV Model) Click here 14. PERFORM DIAGNOSTIC SYSTEM CHECK for Gasoline Model: Click here for HV Model: Click here
15. INSPECT SRS WARNING LIGHT for Gasoline Model: Click here
for HV Model: Click here
|
Toyota Avalon (XX50) 2019-2022 Service & Repair Manual > Audio And Visual System(for Gasoline Model): Lost Communication with Meter (B1324)
DESCRIPTION This DTC is stored when a communication error occurs between the radio and display receiver assembly and combination meter assembly. DTC No. Detection Item DTC Detection Condition Trouble Area B1324 Lost Communication with Meter CAN reception error Local bus communication line Combinatio ...