INSTALLATION PROCEDURE 1. ADJUST COMPRESSOR OIL
2. INSTALL COMPRESSOR WITH MOTOR ASSEMBLY (a) Using an E8 "TORX" socket wrench, temporarily install the compressor with motor assembly with the 2 stud bolts. Torque: 10 N·m {102 kgf·cm, 7 ft·lbf} (b) Install the compressor with motor assembly with the bolt and 2 nuts. 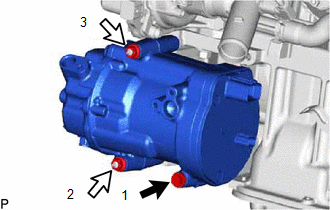
Torque: 24.5 N·m {250 kgf·cm, 18 ft·lbf} HINT: Tighten the bolt and nuts in the order shown in the illustration. (c) Connect the connector (B). 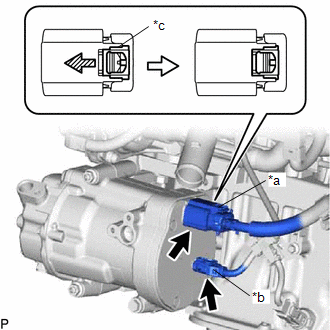
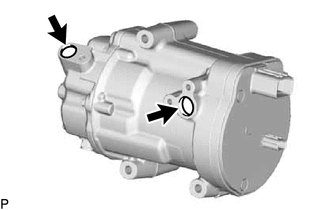
(d) Remove the insulating tape from the connector (A). (e) Connect the connector (A) and slide the green-colored lock as shown in the illustration to securely lock it. CAUTION: Make sure to wear insulated gloves. NOTICE: Make sure that the connector is connected securely. 3. CONNECT NO. 1 COOLER REFRIGERANT DISCHARGE HOSE SUB-ASSEMBLY (a) Remove the vinyl tape from the No. 1 cooler refrigerant discharge hose sub-assembly. (b) Sufficiently apply compressor oil to a new O-ring and the fitting surface of the compressor with motor assembly. Compressor Oil: ND-OIL 11 or equivalent (c) Install the O-ring to the No. 1 cooler refrigerant discharge hose sub-assembly. NOTICE: Keep the O-ring and O-ring fitting surface free of foreign matter. (d) Connect the No. 1 cooler refrigerant discharge hose sub-assembly to the compressor with motor assembly with the bolt. Torque: 9.8 N·m {100 kgf·cm, 87 in·lbf} 4. CONNECT SUCTION HOSE SUB-ASSEMBLY (a) Remove the vinyl tape from the suction hose sub-assembly. (b) Sufficiently apply compressor oil to a new O-ring and the fitting surface of the compressor with motor assembly. Compressor Oil: ND-OIL 11 or equivalent (c) Install the O-ring to the suction hose sub-assembly. NOTICE: Keep the O-ring and O-ring fitting surface free of foreign matter. (d) Connect the suction hose sub-assembly to the compressor with motor assembly with the bolt. Torque: 9.8 N·m {100 kgf·cm, 87 in·lbf} 5. INSTALL RADIATOR ASSEMBLY Click here 6. INSTALL SERVICE PLUG GRIP Click here 7. CHARGE AIR CONDITIONING SYSTEM WITH REFRIGERANT Click here 8. WARM UP COMPRESSOR Click here 9. INSPECT FOR REFRIGERANT LEAK Click here |
Toyota Avalon (XX50) 2019-2022 Service & Repair Manual > Tire Pressure Warning System(for Gasoline Model): Transmitter ID 1 not Received (Main) (C2121-C2124,C2181-C2184)
DESCRIPTION The tire pressure warning valve and transmitters that are installed in the tire and wheel assemblies measure the tire pressure of each wheel. The measured values are transmitted to the tire pressure warning ECU and receiver in the vehicle as radio waves. The ECU compares the measured tir ...