INSTALLATION PROCEDURE 1. PRECAUTION (a) w/o Navigation System: NOTICE:
(b) w/ Navigation System: NOTICE:
2. INSTALL RADIO AND DISPLAY RECEIVER ASSEMBLY 3. INSTALL NO. 2 INSTRUMENT PANEL REGISTER ASSEMBLY (a) Engage the 8 claws to install the No. 2 instrument panel register assembly as shown in the illustration. 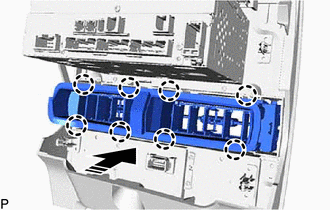
4. INSTALL NO. 2 RADIO RECEIVER BRACKET (a) Install the No. 2 radio receiver bracket with the 4 screws. 5. INSTALL NO. 1 RADIO RECEIVER BRACKET (a) Install the No. 1 radio receiver bracket with the 4 screws. 6. INSTALL INTERIOR ILLUMINATION LIGHT SUB-ASSEMBLY Click here 7. INSTALL RADIO AND DISPLAY RECEIVER ASSEMBLY WITH BRACKET (a) Connect each connector. (b) Engage the 5 clips to temporarily install the radio and display receiver assembly with bracket as shown in the illustration. 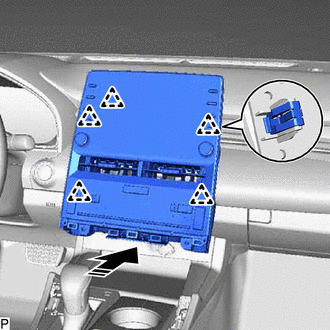
(c) Install the radio and display receiver assembly with bracket with the 4 bolts. 8. INSTALL CENTER NO. 2 INSTRUMENT CLUSTER FINISH PANEL Click here
9. INSTALL CENTER NO. 1 INSTRUMENT CLUSTER FINISH PANEL Click here 10. INSTALL CENTER INSTRUMENT CLUSTER FINISH PANEL SUB-ASSEMBLY Click here 11. INSTALL CONSOLE BOX POCKET SUB-ASSEMBLY Click here 12. INSTALL FRONT CONSOLE UPPER PANEL GARNISH Click here 13. INSTALL LOWER INSTRUMENT PANEL FINISH PANEL RH Click here 14. INSTALL LOWER INSTRUMENT PANEL FINISH PANEL LH Click here |
Toyota Avalon (XX50) 2019-2022 Service & Repair Manual > Pre-collision System(for Hv Model): Dtc Check / Clear
DTC CHECK / CLEAR CHECK DTC (a) Connect the Techstream to the DLC3. (b) Turn the power switch on (IG). (c) Turn the Techstream on. (d) Enter the following menus: Body Electrical / Pre-Collision 2 / Trouble Codes. (e) Check for DTCs. Click here Body Electrical > Pre-Collision 2 > Trouble Codes ...


