REMOVAL PROCEDURE 1. PRECAUTION (a) w/o Navigation System: NOTICE:
(b) w/ Navigation System: NOTICE:
2. REMOVE LOWER INSTRUMENT PANEL FINISH PANEL LH Click here
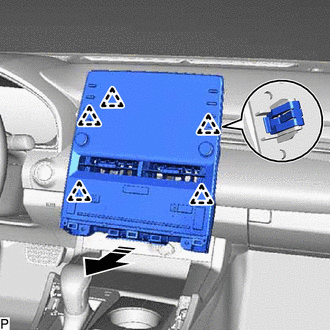
3. REMOVE LOWER INSTRUMENT PANEL FINISH PANEL RH Click here 4. REMOVE FRONT CONSOLE UPPER PANEL GARNISH Click here 5. REMOVE CONSOLE BOX POCKET SUB-ASSEMBLY Click here 6. REMOVE CENTER INSTRUMENT CLUSTER FINISH PANEL SUB-ASSEMBLY Click here 7. REMOVE CENTER NO. 1 INSTRUMENT CLUSTER FINISH PANEL Click here 8. REMOVE CENTER NO. 2 INSTRUMENT CLUSTER FINISH PANEL Click here 9. REMOVE RADIO AND DISPLAY RECEIVER ASSEMBLY WITH BRACKET
(b) Pull the radio and display receiver assembly with bracket toward the rear of the vehicle to disengage the 5 clips. 
(c) Disconnect each connector and remove the radio and display receiver assembly with bracket. 10. REMOVE INTERIOR ILLUMINATION LIGHT SUB-ASSEMBLY Click here
11. REMOVE NO. 1 RADIO RECEIVER BRACKET
12. REMOVE NO. 2 RADIO RECEIVER BRACKET
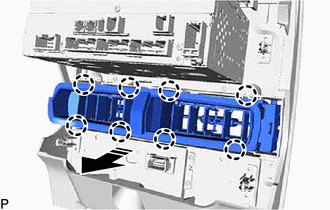
13. REMOVE NO. 2 INSTRUMENT PANEL REGISTER ASSEMBLY (a) Disengage the 8 claws and remove the No. 2 instrument panel register assembly as shown in the illustration. 
14. REMOVE RADIO AND DISPLAY RECEIVER ASSEMBLY |
Toyota Avalon (XX50) 2019-2022 Service & Repair Manual > Engine Coolant Temperature Sensor: Installation
INSTALLATION PROCEDURE 1. INSTALL ENGINE COOLANT TEMPERATURE SENSOR HINT: Perform "Inspection After Repair" after replacing the engine coolant temperature sensor. Click here (a) Apply a light coat of engine coolant to the O-ring of the engine coolant temperature sensor. (b) Install the engine coolan ...